kiss cut stickers

Using the Silhouette Portrait 3 Pixscan Mat to Cut Stickers

Hi Everyone!

This week I want to share another favorite accessory for my Silhouette Portrait 3, the Pixscan mat! It’s super helpful for cutting stickers or things you may have already printed and now you want to cut them.

First, if you haven’t done so already, you will need to calibrate whatever camera you care going to use. I’m going to be using my iPhone X.

Open Silhouette studio. I currently have not mat selected. I’m going to the little PIX icon on the toolbar to the right of Silhouette Studio.

Click on “Show Calibration Test Card.” A page full of little black dots will pop up.

Pix Scan Mat Calibration

Now we need to print this sheet with all the little black dots. I click on the little printer icon in the toolbar across the top.

My print screen pops up and I’m going to click Print.

Pix Scan Mat Calibration

Then I’m going to select the printer that I will be using to print my stickers which is my Epson P600 and I print out the sheet full of dots on an 8.5” x 11” plain sheet of paper.

Next I need to take a photo of the dotted sheet with my phone or whatever camera you are using. I placed the dotted sheet on the floor (you need to use a flat surface), and tried my best to get all the dots without and background or edges of the paper showing. DO NOT use zoom.

Pix Scan Mat Calibration

Then I airdrop the photo from my phone to my laptop. If you can’t airdrop, you can email it to yourself as well. You need to somehow save the photo onto your computer so you can upload it to Silhouette Studio.

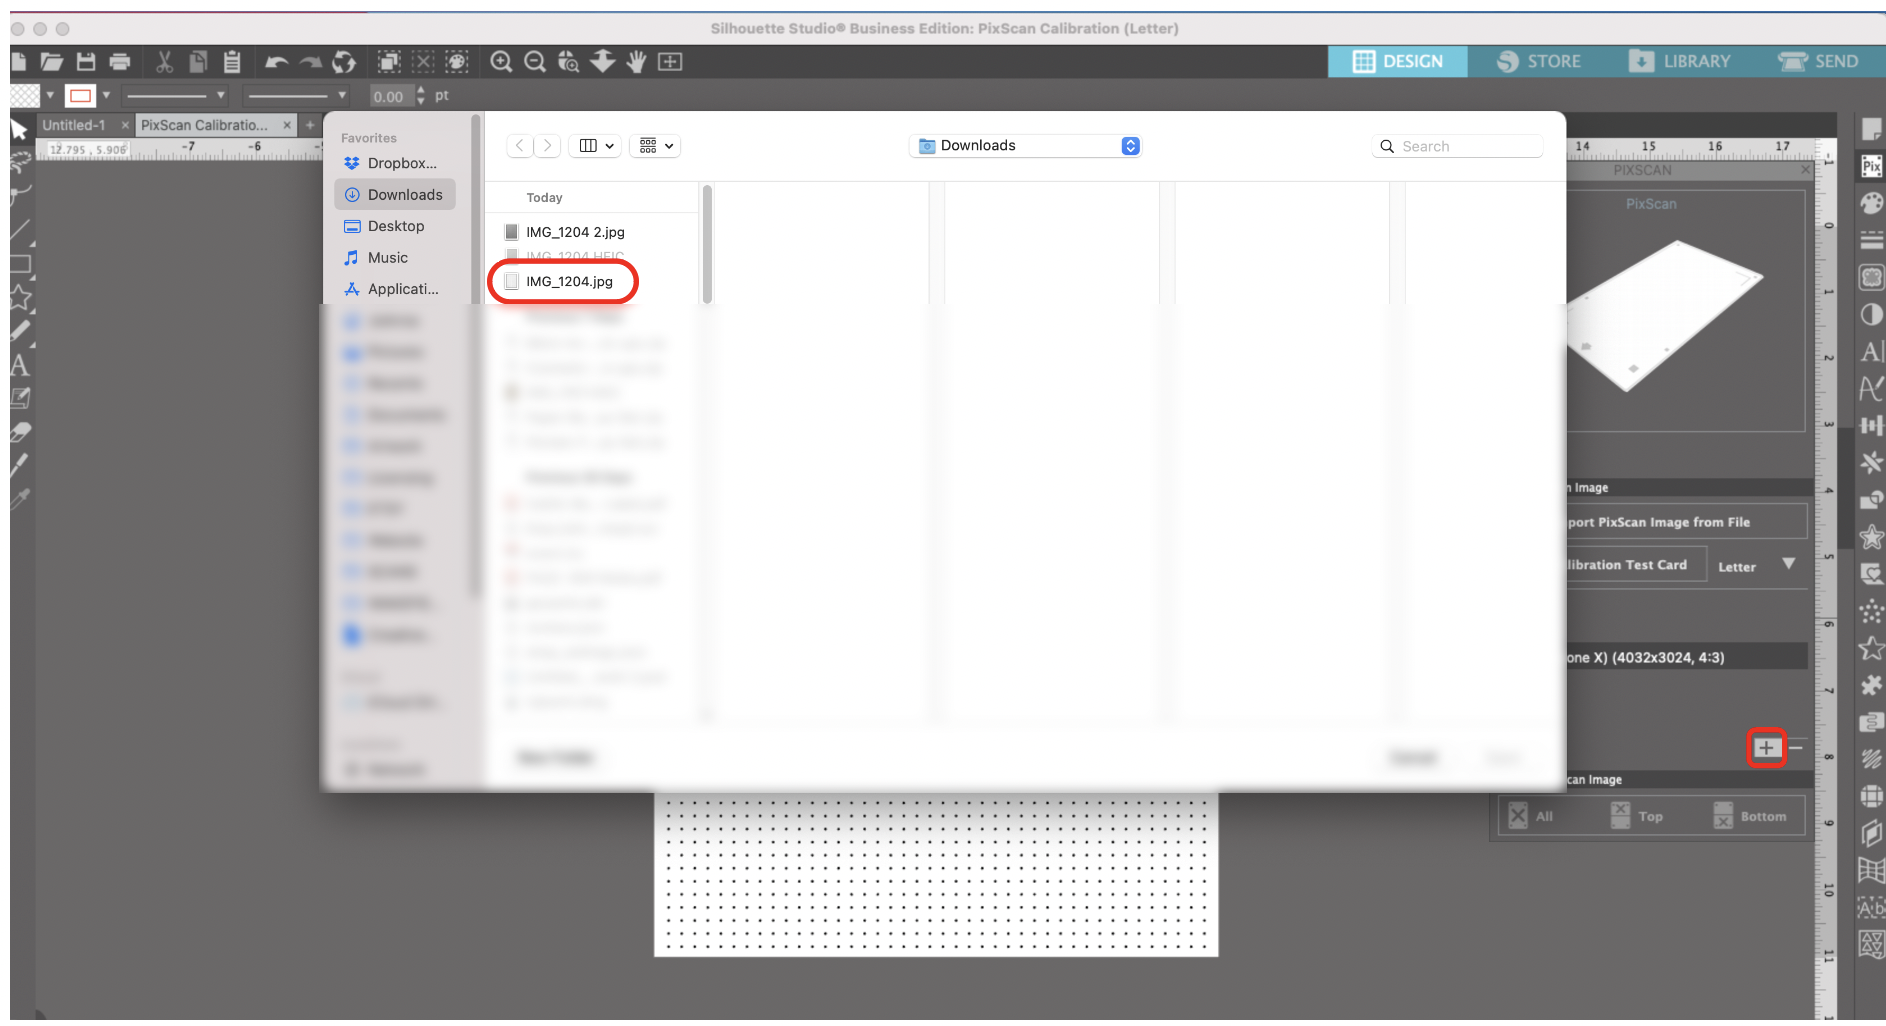
Back in Silhouette Studio in the Pix Scan dialogs box make sure the camera icon is selected. Below that, there is a Plus (+). Click on the (+), and find the photo that you just saved to your computer. Mine is saved to my Downloads folder.

Silhouette Studio automatically reads all the information attached to photo and it adds my iPhone X to the list of cameras.

Pix Scan Mat Calibration

Now it’s time to get our mat ready! Unfortunately the Pix Scan mat for the Portrait 3 is a little too small to fit a full sheet of 8.5” x 11” sticker paper, the max area is 7.6” x 11.7”. Make sure to plan your project accordingly! I already had my print outs, so I just cut them into two parts to fit on the mat.

Silhouette Portrait 3 Pix Scan Mat

Place whatever you are cutting on the mat, make sure you are NOT covering any of the little black boxes around the edge of the mat. The software will need to read those when you’re importing your picture.

Then you need to photograph the ENTIRE mat with the same camera that you calibrated. Make sure the mat is on a flat surface and there is even lighting. Don’t use zoom!

Silhouette Portrait 3 Pix Scan Mat

After you get your photo, you need to upload the photo to your computer. I use airdrop, but you could email it to yourself as well.

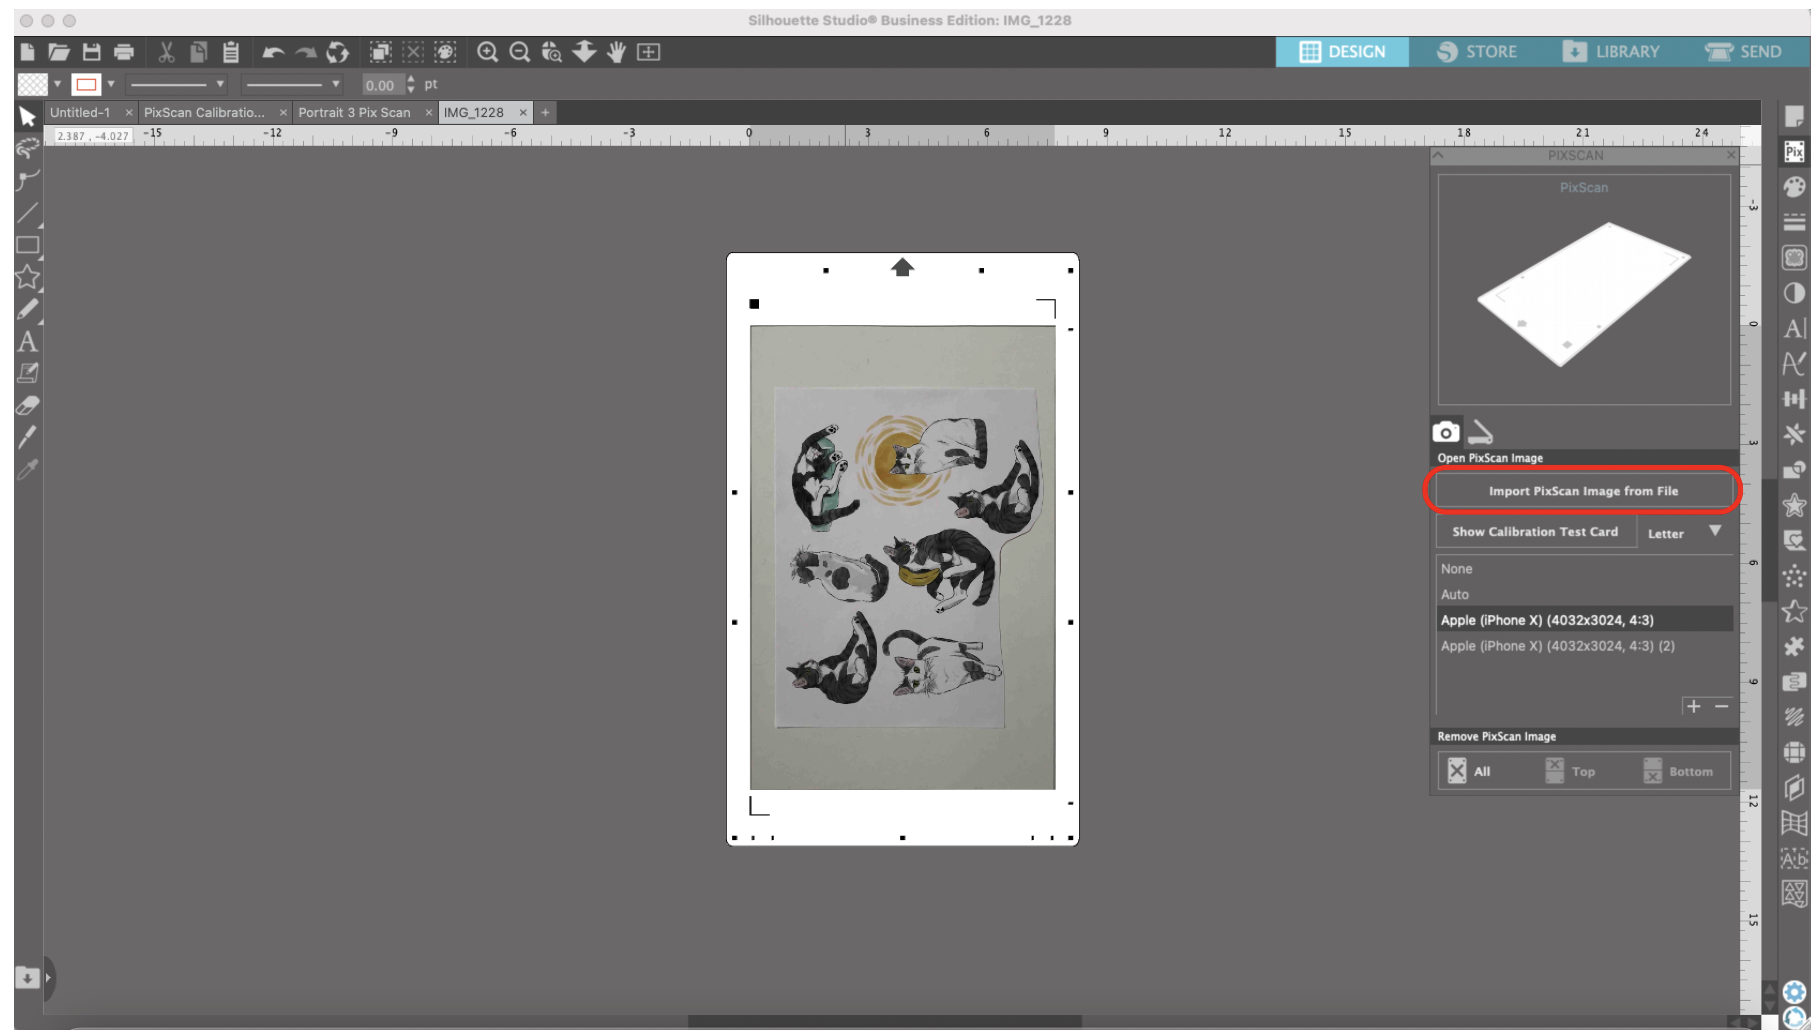
In the Pix Scan dialog box in Silhouette Studio, select “Import Pix Scan Image From File.” Locate your file wherever you have it saved on your computer, mine is in my Downloads folder again.

Silhouette studio is then going to place the photo that you just took and place it on the Pix Scan mat in the software.

Silhouette Portrait 3 Pix Scan Mat

Now we need to create our cut lines and there are a few ways to do that. I already have cut lines I created in Illustrator, I could import them as an SVG since I have the Business version of Silhouette Studio.

If you do not have the business version of Silhouette Studio, you can also draw the cut lines freehand in Silhouette Studio or you can use the Trace function.

I’m going to use the Trace function for these stickers since they’re irregular shapes. I will make a separate post later on how to use the trace tool.

Silhouette Portrait 3 Pix Scan Mat

I’m finished making my cut lines, and now it’s time to send to my machine! But first, I’m going to save my file so I can use these cut lines again on the second piece of sticker paper.

I go to the SEND tab in Silhouette Studio and since we’re just cutting, I’ll keep it on the Simple screen.

Silhouette Portrait 3 Pix Scan Mat

I load my mat into my machine, make sure the side with the arrow get’s fed through the machine first.

Silhouette Portrait 3 Pix Scan Mat

Press send, and now I have some cute little kitty stickers!

Silhouette Portrait 3 Pix Scan Mat

The accuracy of the Pix Scan Mat is so much better than the Cricut Snap Mat feature. I also really like that I can create and save my cut lines directly in Silhouette Studio. When I go to cut the the 2nd piece of this sticker sheet I can use the same cutline for the same kitties.

Cricut Snap Mat Feature to Cut Stickers

Hi Everyone!

Online, I see suggestions all the time for using the Cricut Snap Mat feature to cut stickers. I’m going to give it try this week! (SPOILER ALERT: This is not one of my preferred methods to cut stickers).

First things first, Snap Mat is only available on the Cricut App, not the desktop version of Design Space. I’m going be using my iPad Pro, but you can also use your phone.

I’m going to try cutting the same kitty stickers I’ve been cutting the last few weeks so we can also compare the results.

I’m going to test this out initially on plain paper so I don’t waste my sticker paper. I’ve got a test sheet already printed on plain paper and I’m going to place it on my mat. For this feature, I should be able to place it anywhere on the mat.

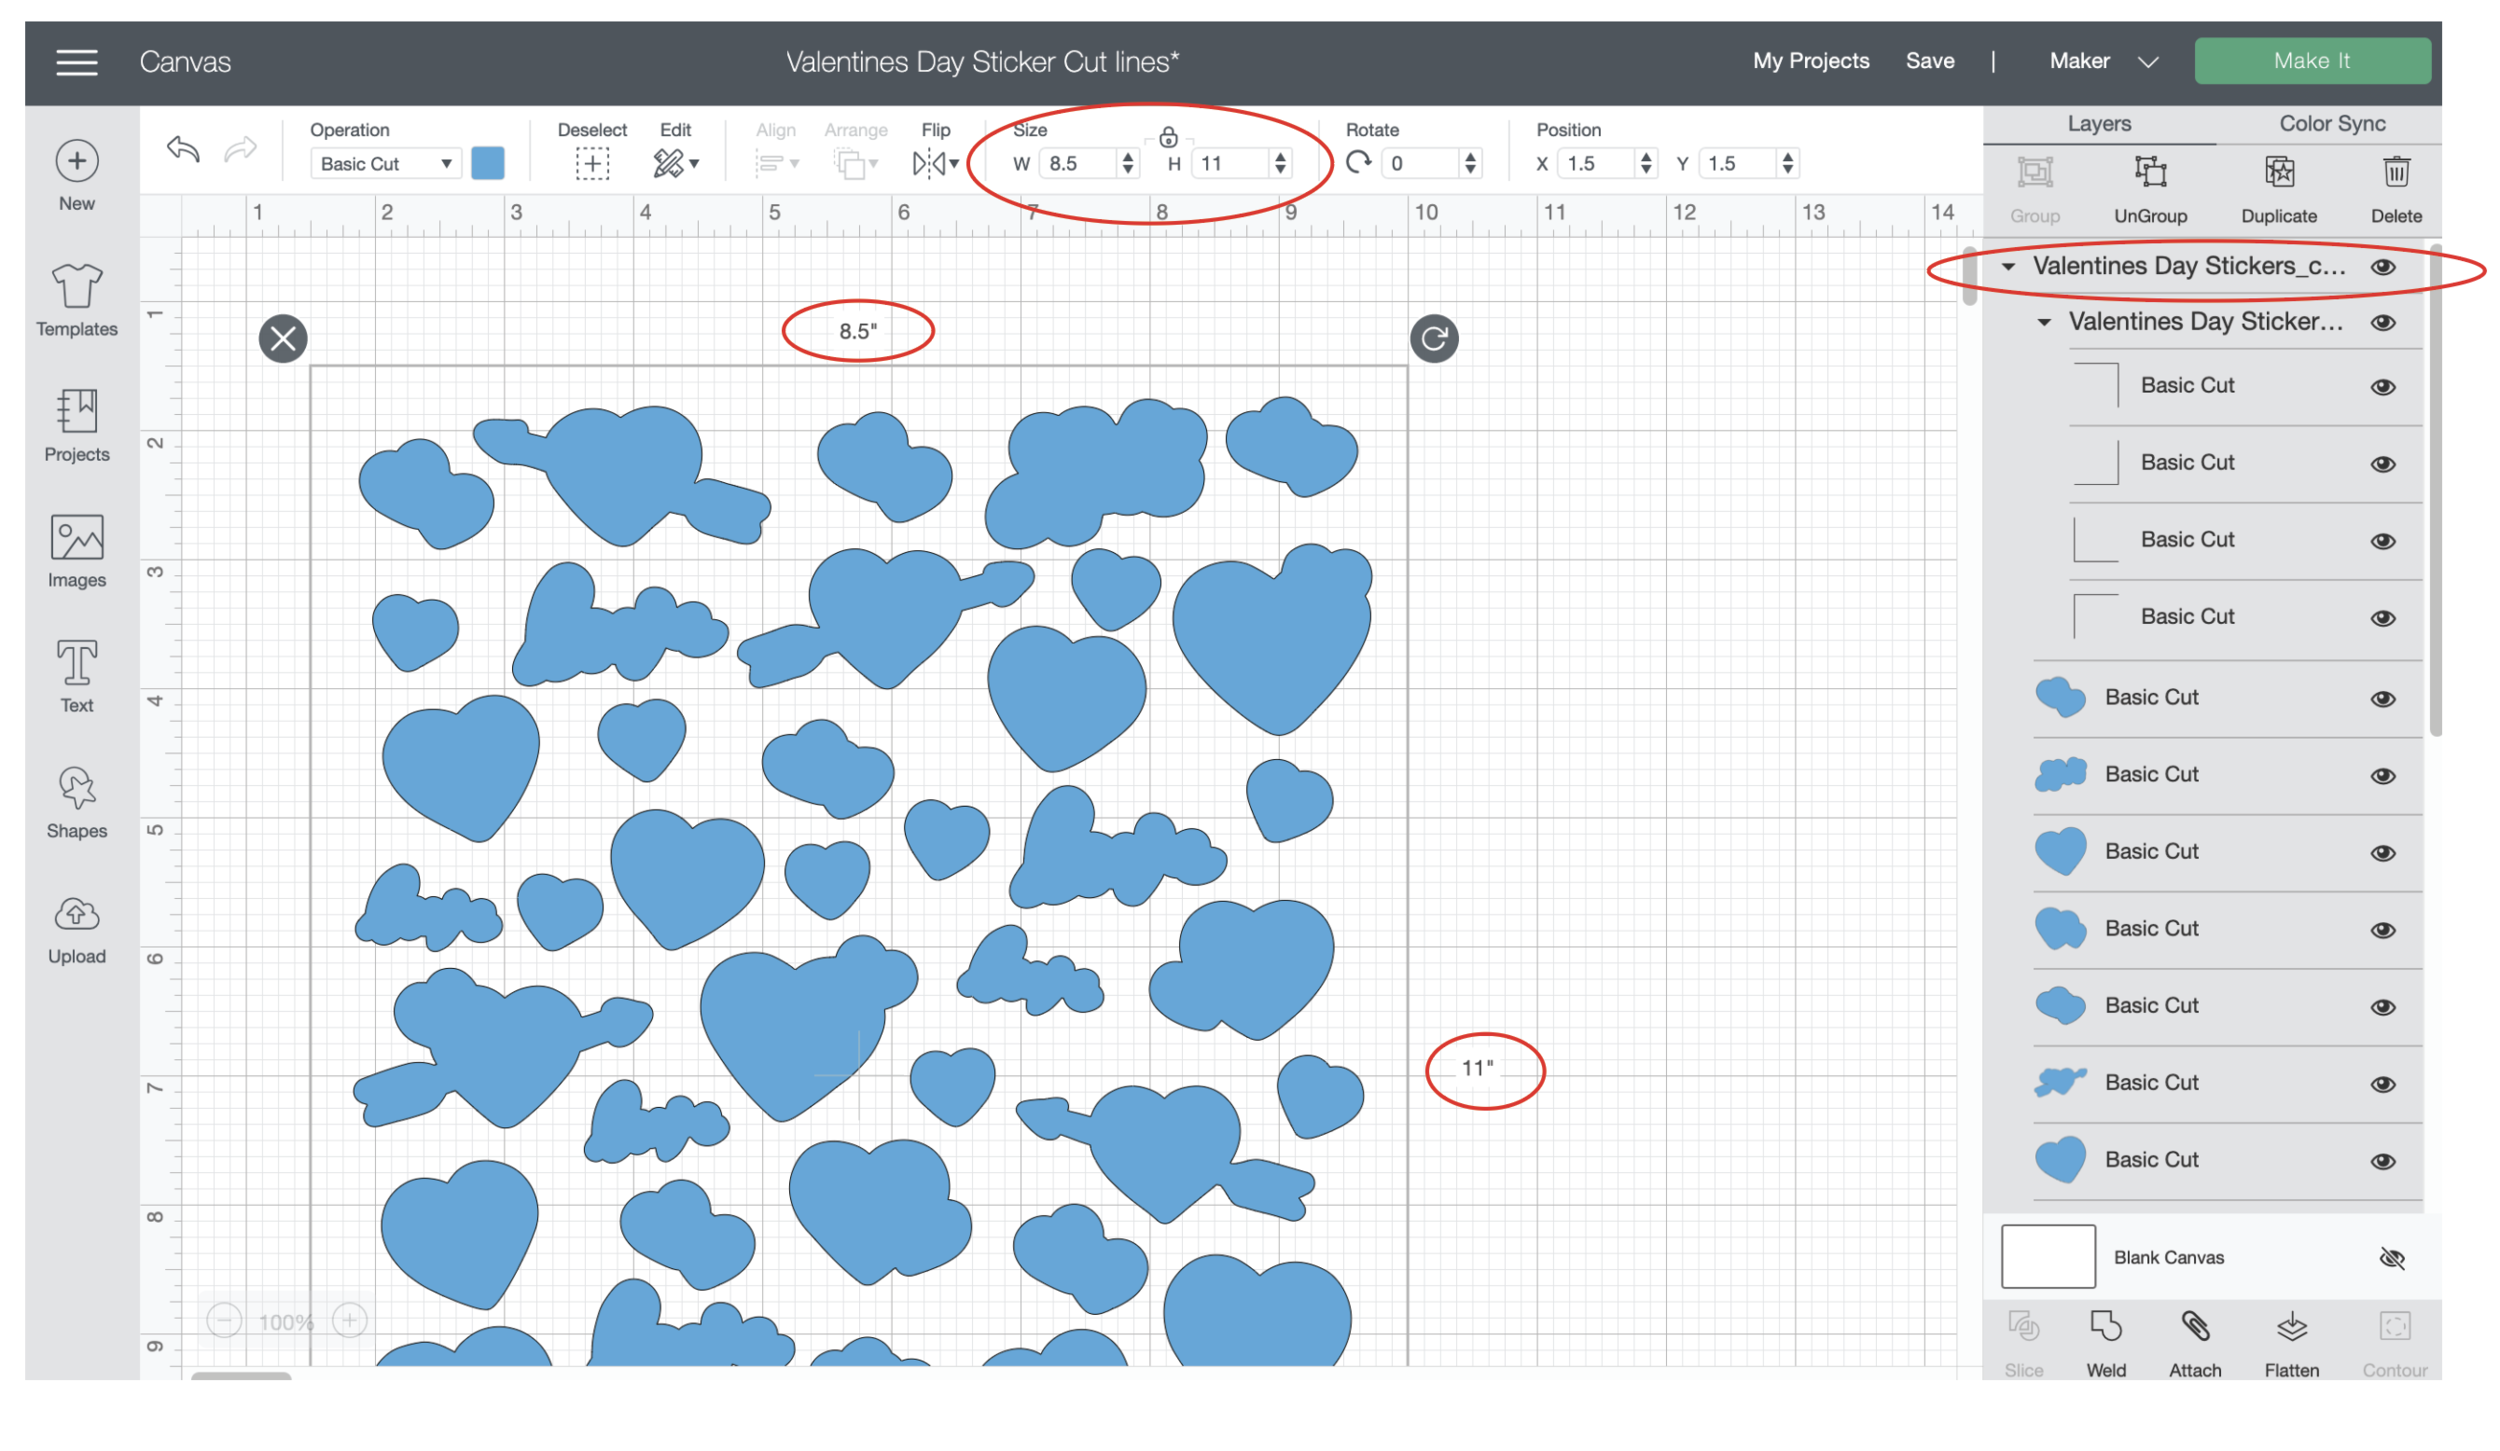
In order to access the Snap Mat feature, you need to have your cutlines already created in Design Space or uploaded into Design Space from Illustrator or other software. I’m going to open the cutlines for the kitty stickers that I already have uploaded from Illustrator and saved to Design Space.

Cutting Stickers Cricut Snap Mat

Then I’m going to tap the little green Make It in the bottom right corner.

Cutting Stickers Cricut Snap Mat

It takes me to the Make It screen, and down in the bottom left corner there is a little camera icon. Press the camera icon and it’s going to bring us into the Snap Mat feature.

I’ve got my mat with my print out already placed. I am holding my iPad above the mat and trying to get the entire mat within the frame. (It can be little difficult to do if you just finished your morning coffee, like me). It need up being easier to put my mat on the floor and stand over it with my iPad.

Cutting Stickers Cricut Snap Mat

Once the mat is in a position the program thinks will be acceptable it will take a photo and bring it up on your screen. You can decide if you want to use the photo it just took or retake it. I try to make sure my mat is pretty straight and there’s not a lot of “non-mat” area around the edges pf my photo.

Once I get one that I think will work ok, I select Use.

Cutting Stickers Cricut Snap Mat

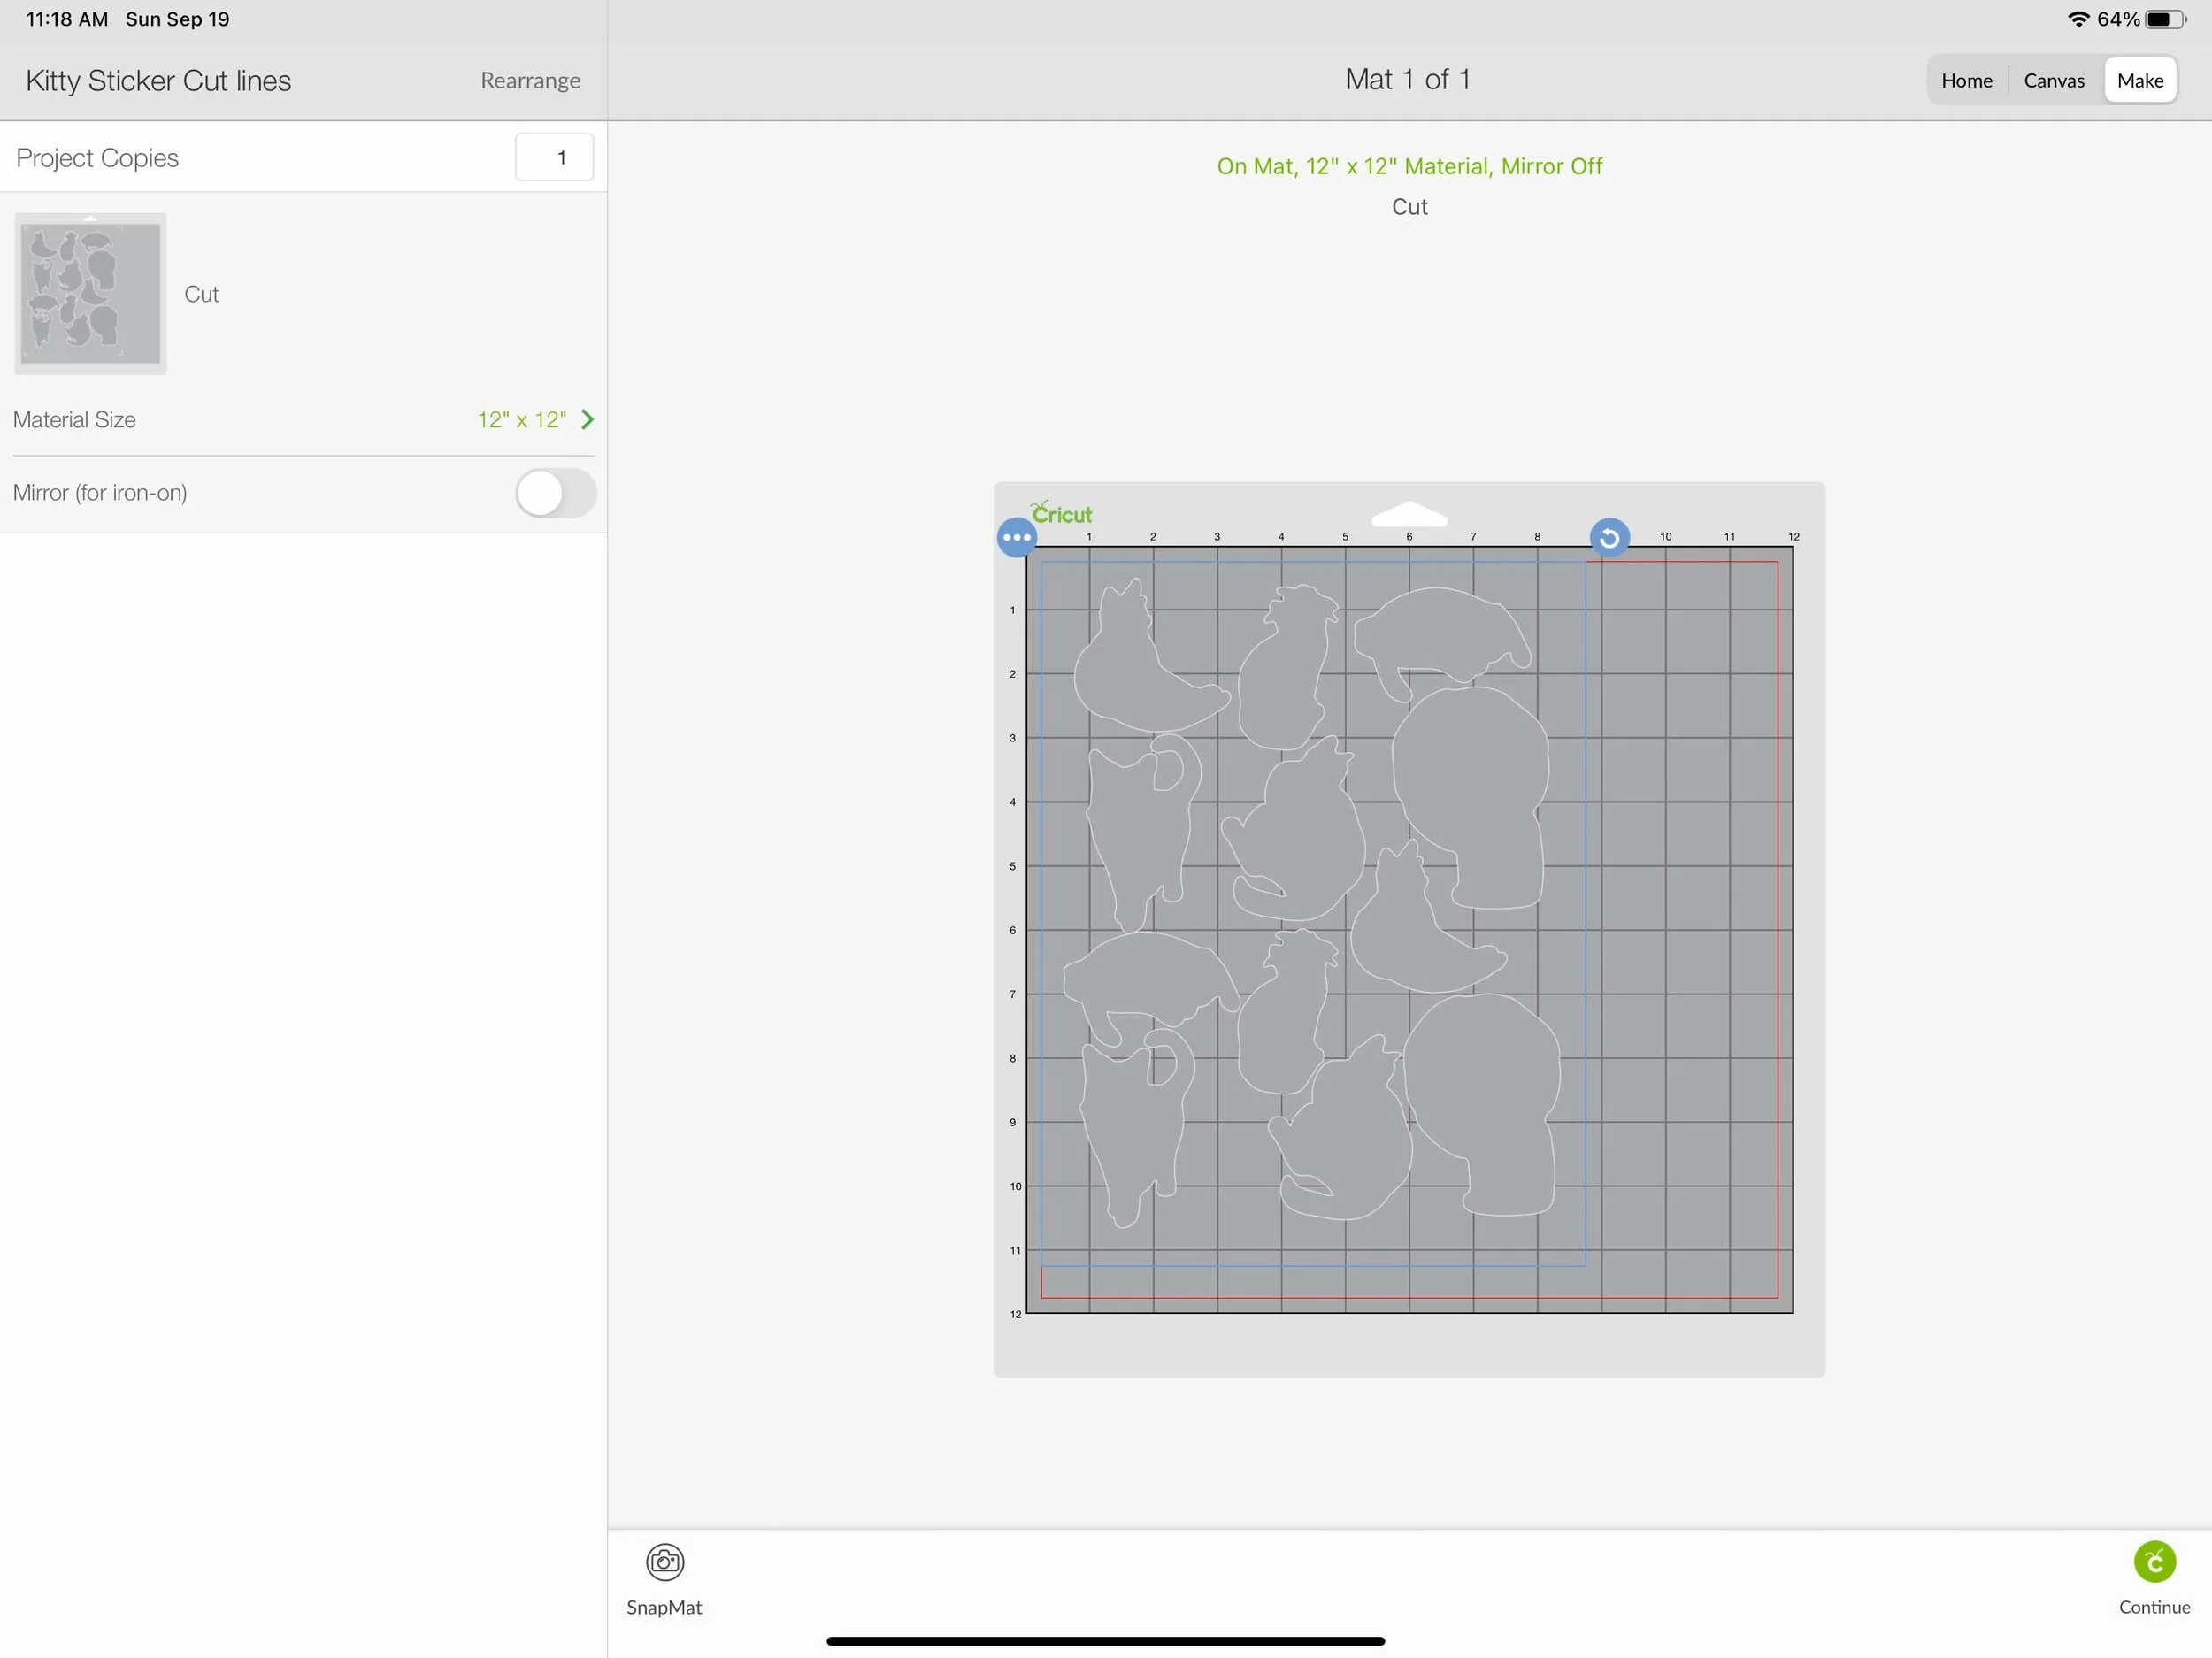
It brings me back to the Make It screen and now I need to position my cut lines. Originally I had all of my cut lines attached so it was all one big group that I could move around. I could get the lines pretty well aligned in some areas, but not in others.

Cutting Stickers Cricut Snap Mat

So I ended up going back to my canvas and unattaching all of the sticker outlines. Now I can move them around individually on the Make It screen. (Slightly tedious). I also moved my print on my mat so it’s closer to the middle and I have more space to move my cut lines around

Cutting Stickers Cricut Snap Mat

Once I get my cut lines all positioned, I press make it and send to my machine.

Cutting Stickers Cricut Snap Mat

I am loading my mat how I showed you in Part One of cutting full sticker sheets - mat all the way against the left bracket, and push up against the black rubber rollers. I don’t know if it really affects this method, but I try to always load my mat this way, just out of habit.

I press go, and once the machine is done cutting I check my cut. Not super perfect, but it still looks pretty good. Much better than the last time I tried to use this feature.

Cutting Stickers Cricut Snap Mat

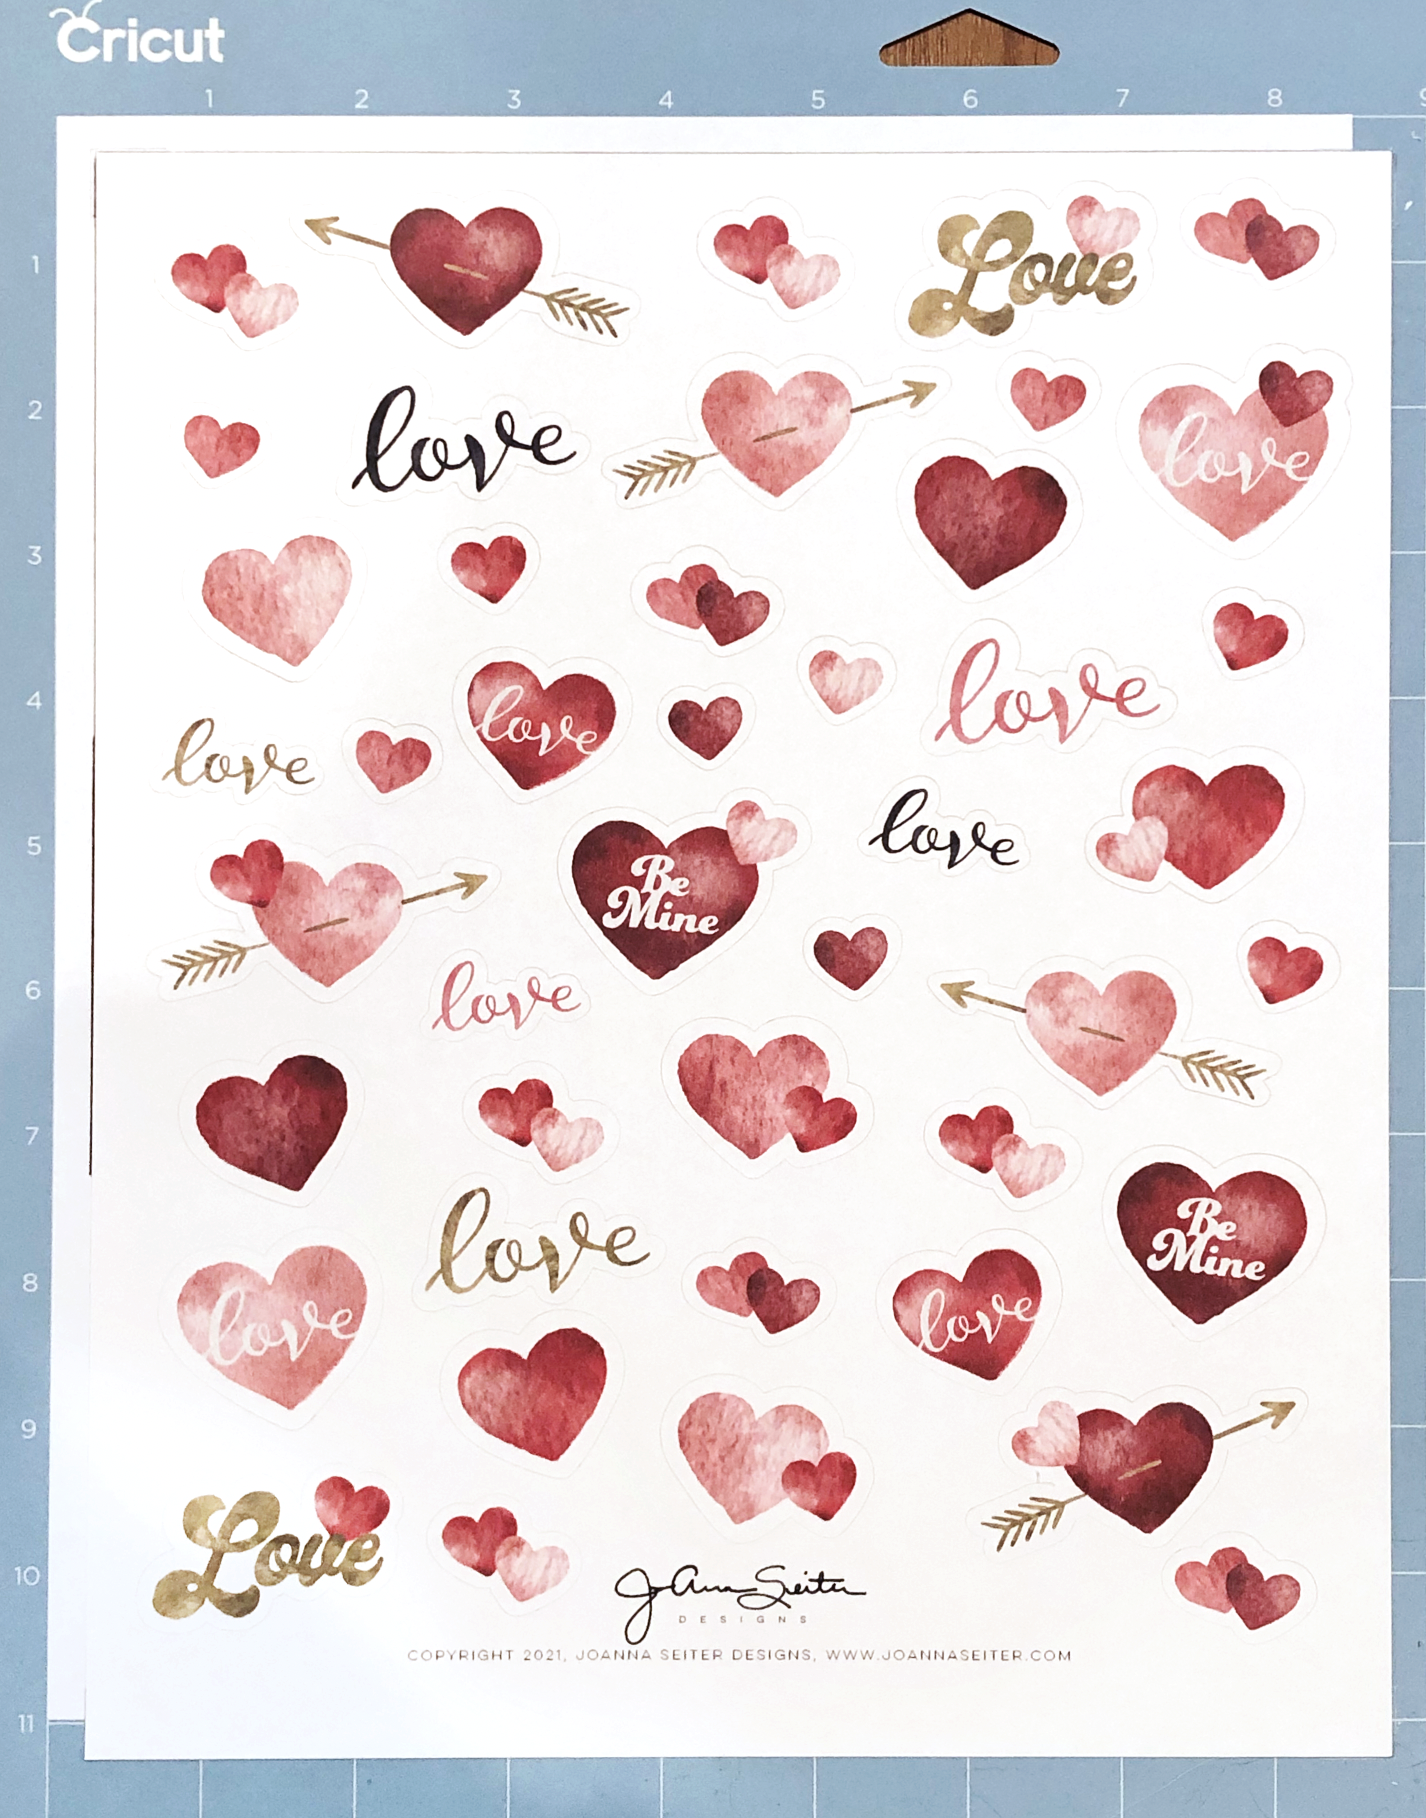
Now, I’m going to try with my sticker paper. I place my sticker sheet on my mat.

I have to use the Snap Mat button take another photo of my mat because my placement is most likely not the same as my test cut.

Cutting Stickers Cricut Snap Mat

I need to move my cut lines around to match the new photo. Once they’re in place, I press Continue.

I’m going to do these as a kiss cut, so I select Washi Sheet as my Material. I load my mat into my machine and I press GO!

Uh Oh! Something’s not right and my cut lines are shifted too far down from my artwork.

Cutting Stickers Cricut Snap Mat

I’m going to try another sticker sheet to see if I can get better results. I load another sticker sheet onto my mat. Go through all the Snap Mat steps again. Load my machine and press go.

My cut is still too far down. I’m thinking I have too much of my floor showing at the top of the mat when I am taking the photo of my mat. I’m going try again, but I’m going to leave the same sticker sheet on my mat for now.

Cutting Stickers Cricut Snap Mat

I do another photo of my mat with the snap mat feature, I’m trying to get as little floor showing at the top of the mat as possible. It’s a little tricky to do since the program automatically takes the photo, so I have to retake it several times before I get one that I want to try to use.

Cutting Stickers Cricut Snap Mat

I load my mat into my machine and cut the sticker sheet again. The results were better this time, but still not super great.

Overall, I would not use this method if you are trying to mass produce stickers. It can be pretty tedious, and it’s not a super accurate or consistent method. I would only potentially use the Snap Mat feature if I was trying to use up scraps of materials and I don’t need super precise alignment. It’s also very time consuming to have to reposition the cut lines for every sticker sheet you want to cut

Cutting Full Sticker Sheets with Your Cricut - Part 1 - Prepping your mat

Hi Everyone!

This week I wanted to start sharing how I cut full sticker sheets with my Cricut. I’m going to demo on my Cricut Maker, but you should be able to do this method on any of Explore or Explore Air machines as well.

I’m going to break this up into a few posts since it is a bit of a tedious process in the beginning. But once you get everything set up it should be pretty easy.

Today we’re going to start with prepping your mat. You don’t need to use a brand new mat, but it needs to be sticky enough that the paper staying in place while the machine is cutting. I will be using a blue mat since it’s not as sticky as the others, but you could also use an older green mat that’s not as sticky anymore.

Before we even print anything to cut, we need to practice loading our mat the SAME WAY EVERYTIME. This is probably the most important part of getting your stickers to cut in the right place eveytime. It’s best to practice, practice, practice before we waste any of our precious sticker paper.

I have a scrap piece of cardstock on my mat the upper left corner. For now, we’re just practicing loading and unloading our mat consistently, so you can also use just a plain piece of paper.

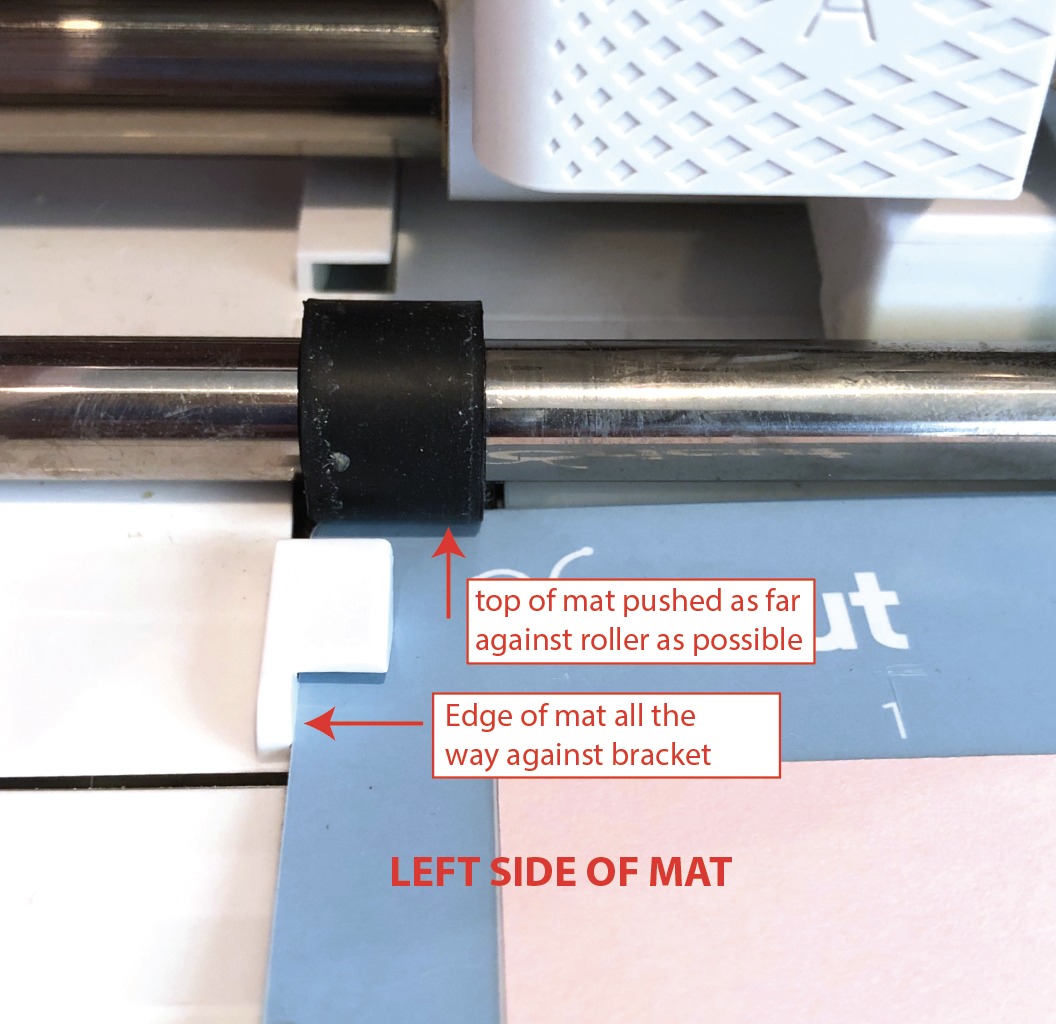
The easiest, most consistent method that works for me is having my mat pushed all the way against the left little bracket and up against the black roller as far as it will go, without forcing it. The right side will have a small gap where it doesn’t touch the bracket, but the mat will still need to be pushed as far against the black roller as it will go, without forcing it.

Screen Shot 2021-08-29 at 8.30.04 PM.png

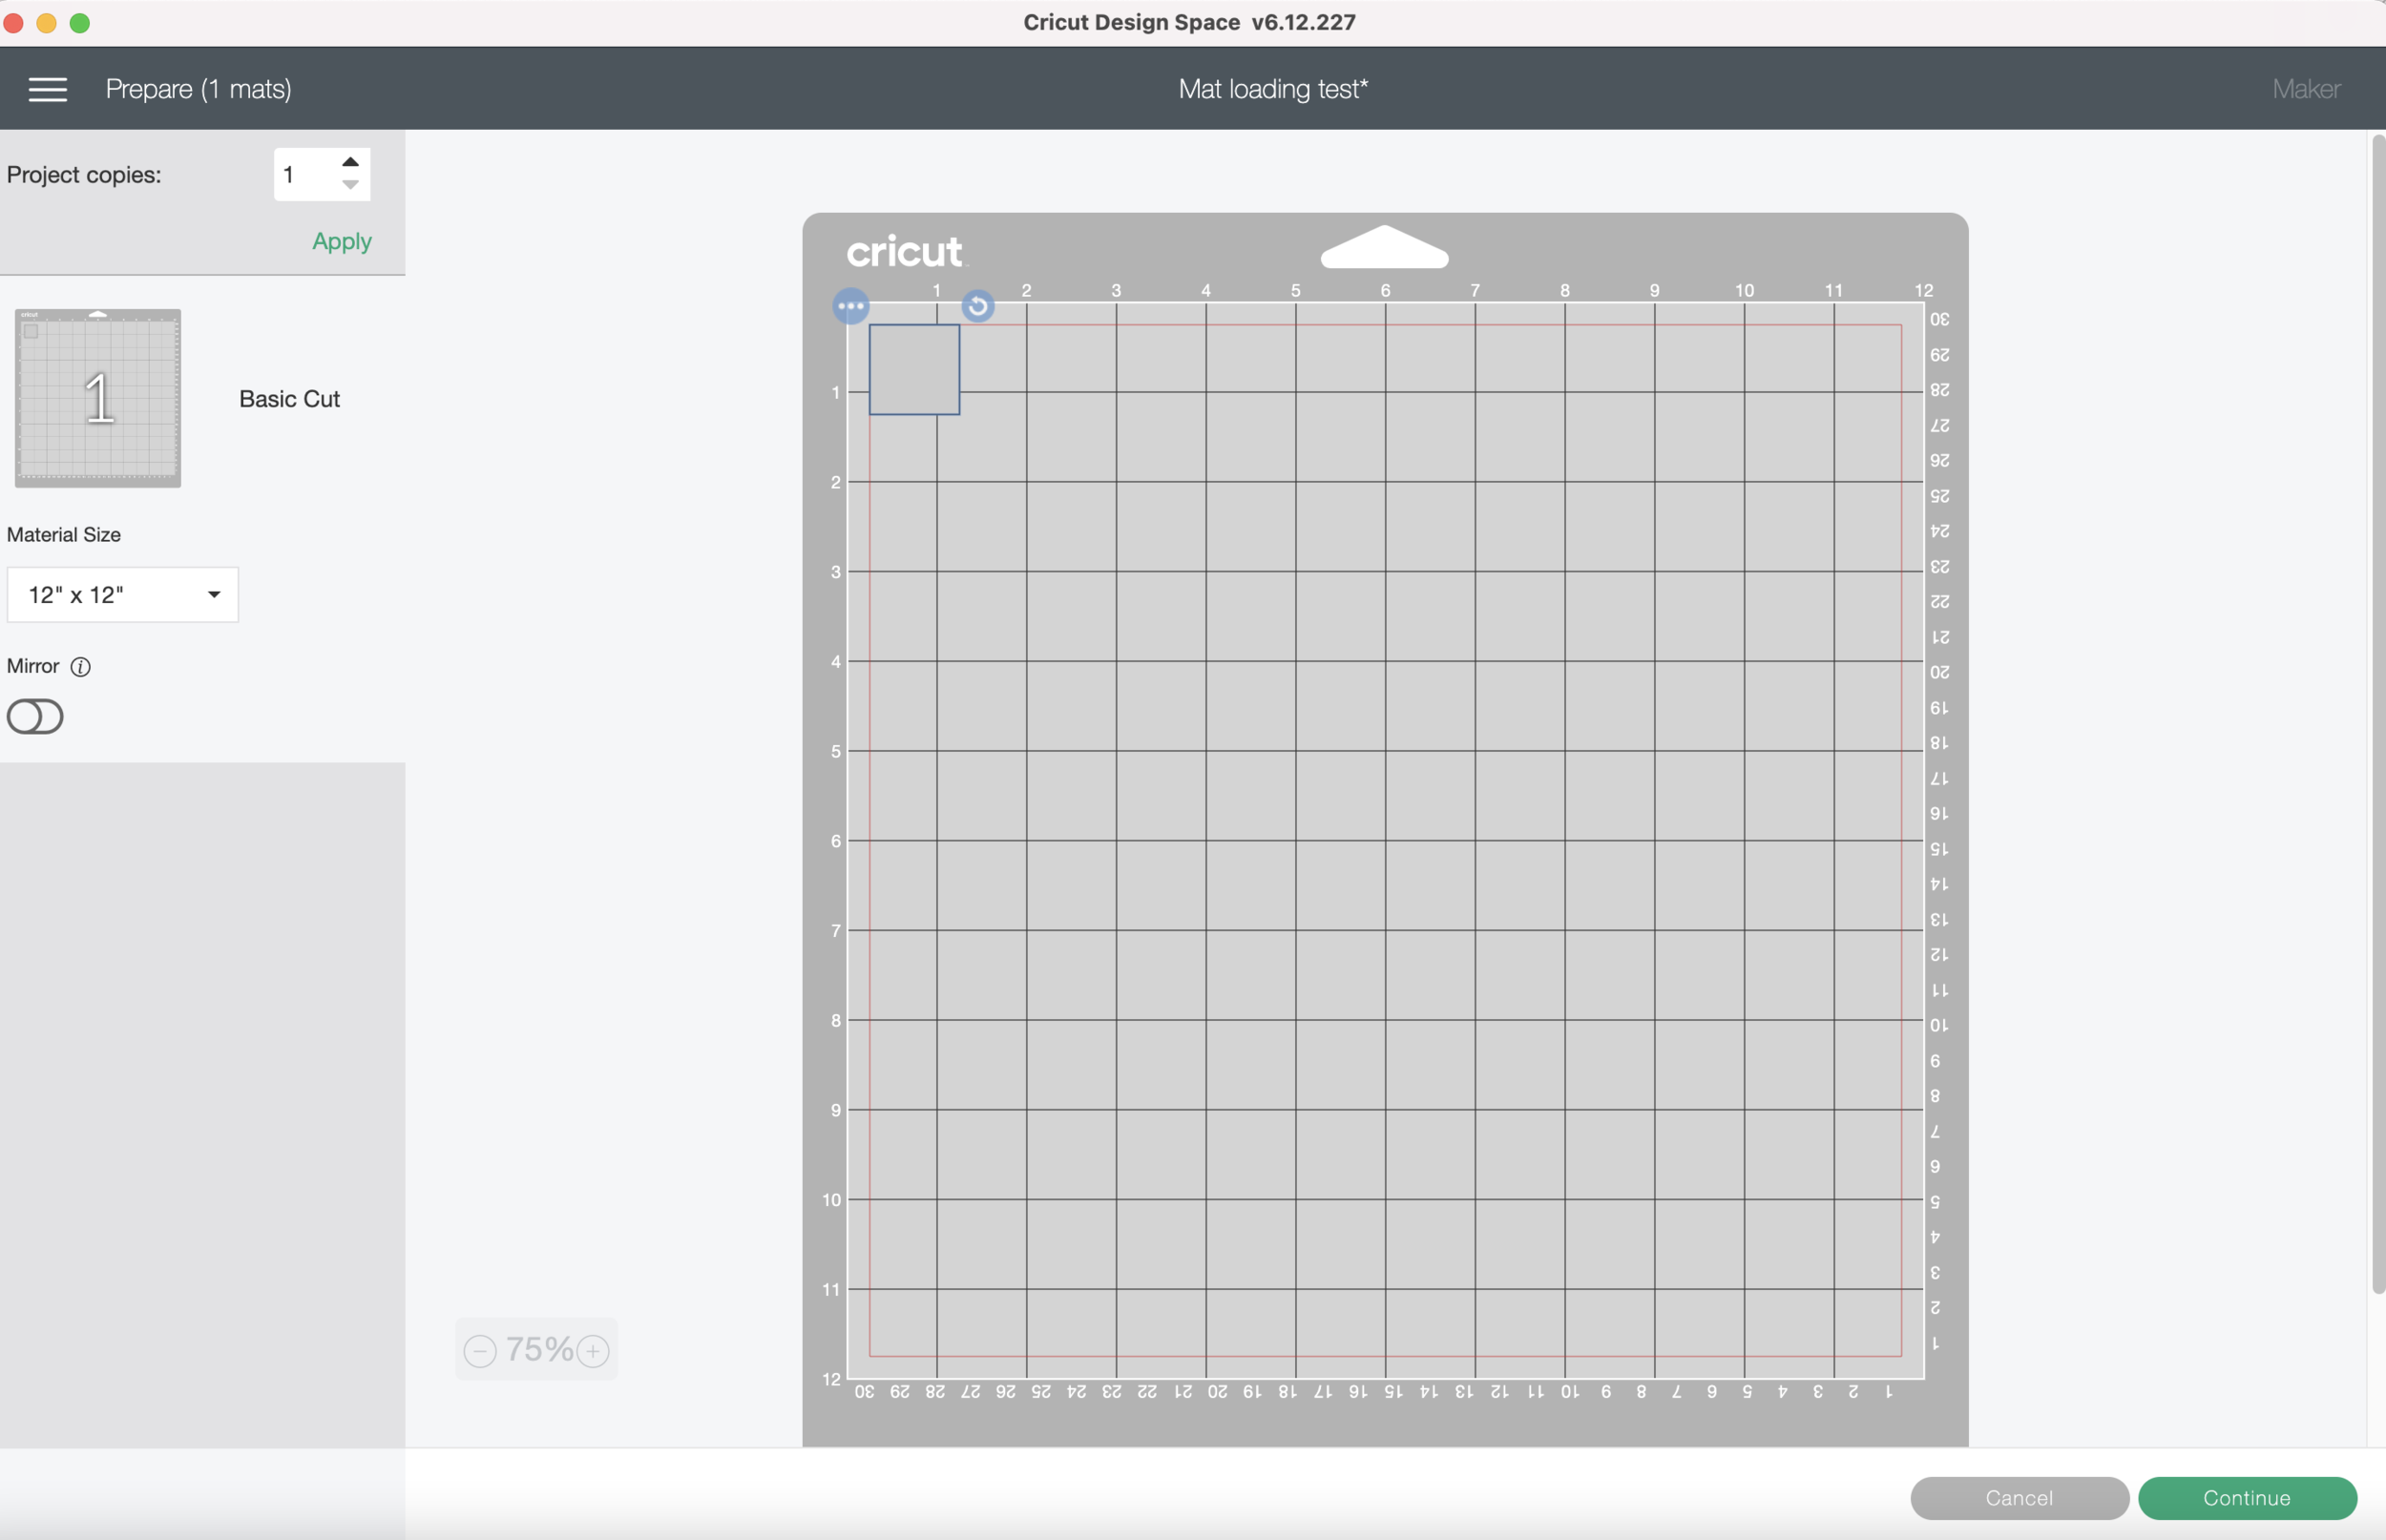
In Cricut Design Space, I made a simple 1” x 1” square to cut from my scrap cardstock. You can use whatever shape you want, this is just to test that I am loading my mat the same way every time.

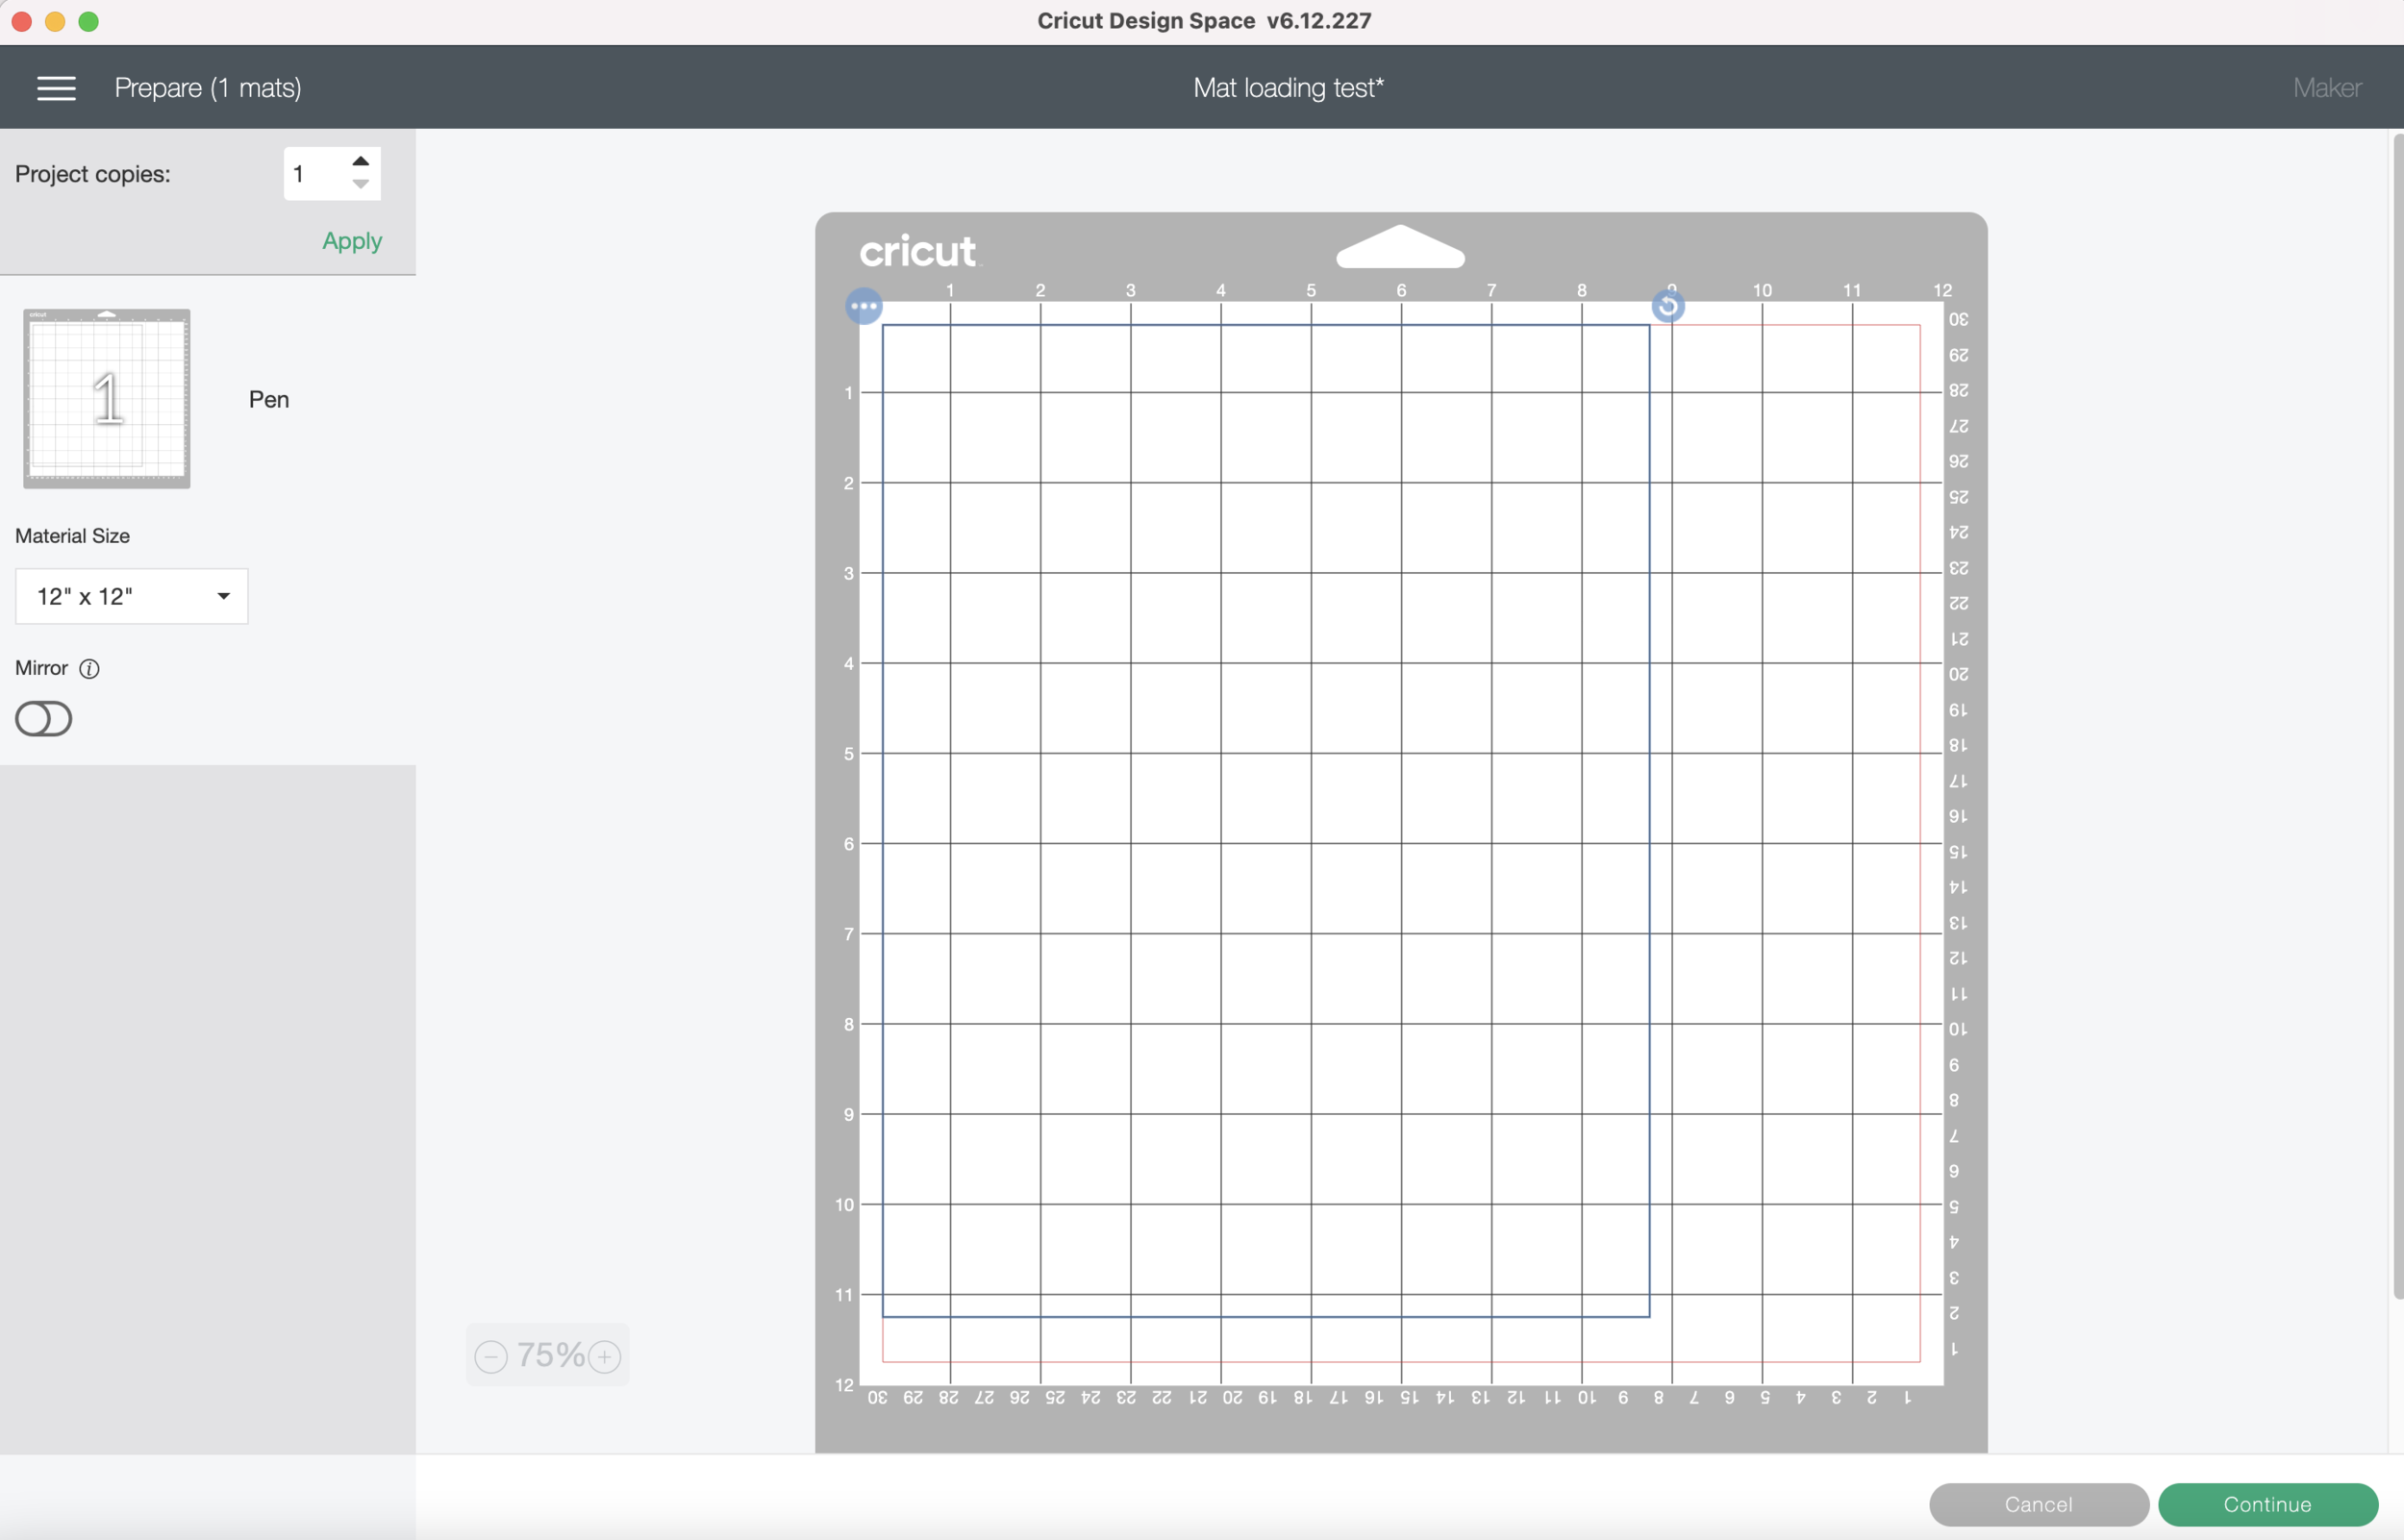
I click “Make it” and Design Space automatically puts my square in the upper left corner. But notice that it’s not completely in the left corner, there’s a red bounding box about a 1/4” inch inside the edges of the grid that I cannot move any elements outside of the red lines. This will be important later when we are setting up our sticker sheets for cutting.

Screen Shot 2021-08-28 at 12.33.18 PM.png

Now I’m going to practice loading my mat - all the way against the left little bracket and up against the black rollers as far as it will go, without forcing it. (See photos above)

I press Go on my machine and let it cut out the square. After it’s done cutting, I’m going to unload my mat.

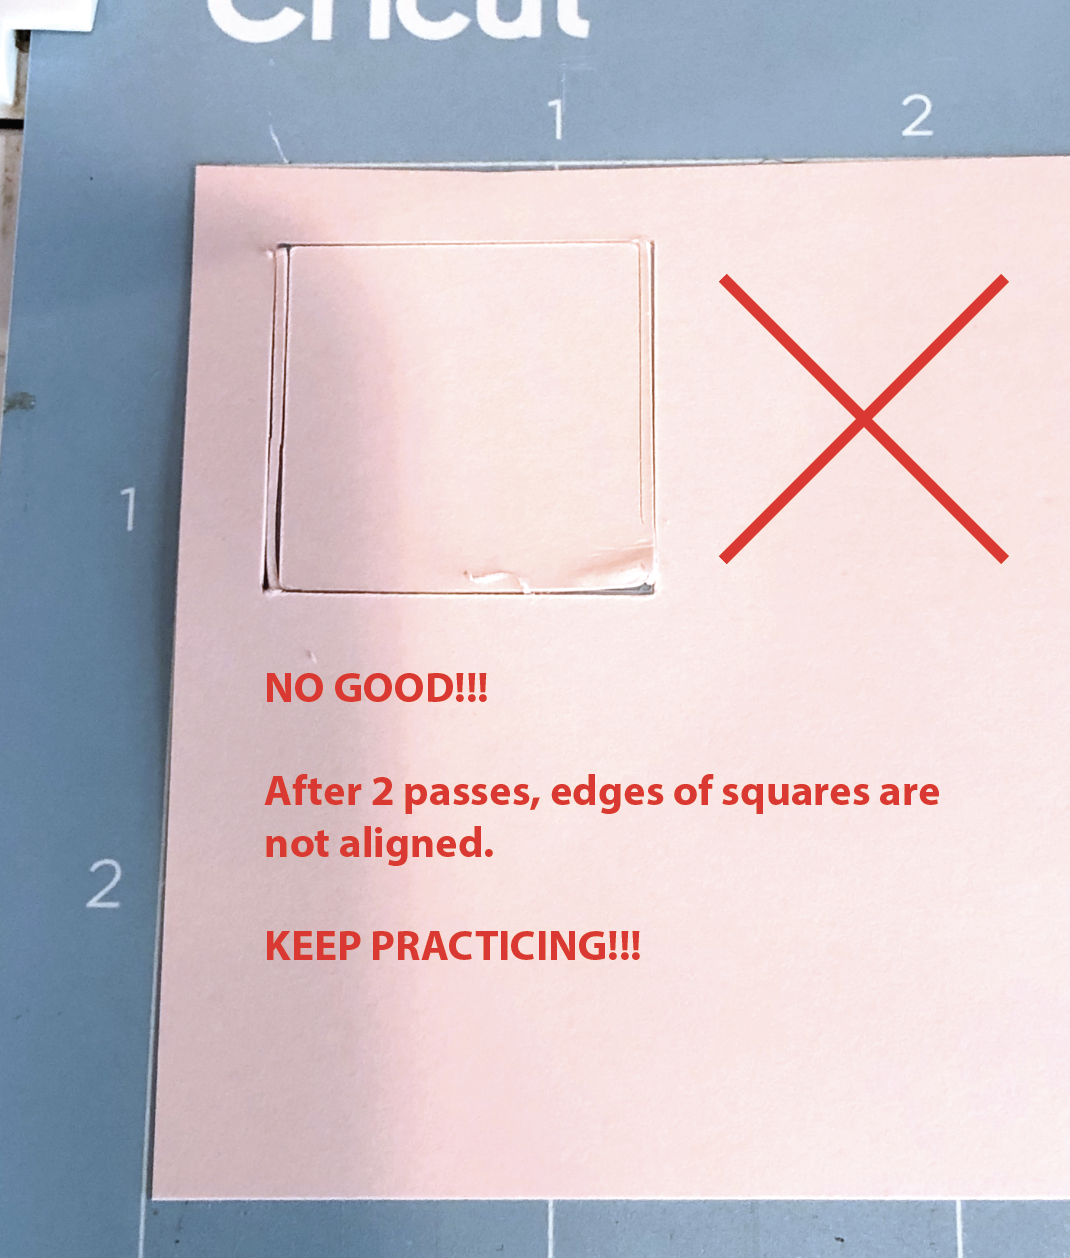
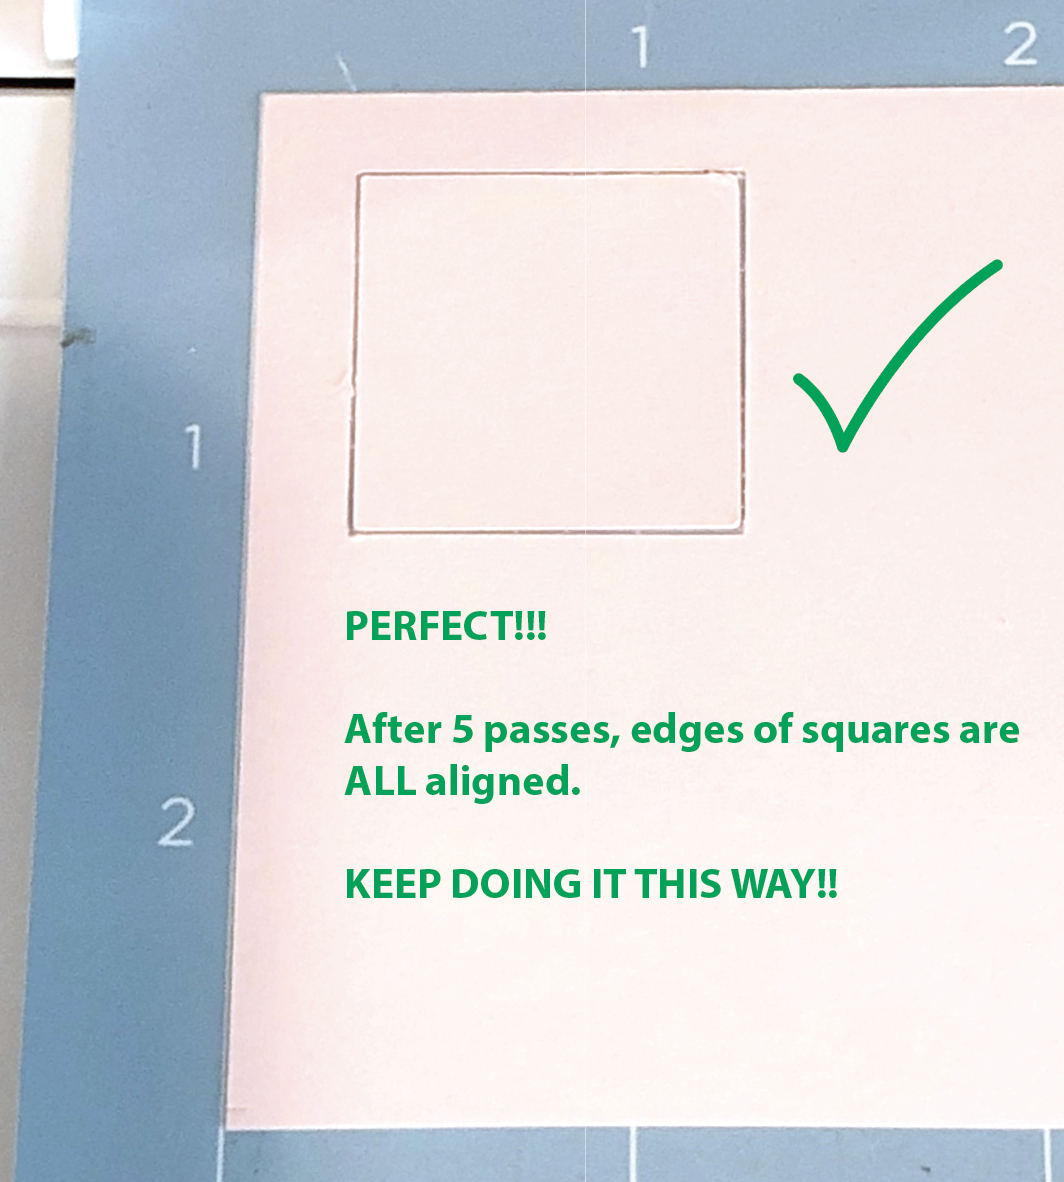
I’m going to leave the already cut cardstock on my mat and send it through my machine again, loading it the EXACT same way I did for the first cut.

If you are loading your machine exactly the same way, the cut lines should be directly on top of the first set of cut lines. If you shifted the placement of your mat, the 2nd set of cut lines will be off.

Keep practicing loading & unloading your mat so all of the cut lines are aligned.

Screen Shot 2021-08-29 at 8.41.58 PM.png

Once you’ve mastered loading your mat, we’re going to mark our mat so we know where to place the sticker paper. You’ve probably seen people use tape or cardstock to mark their mats, I’m not going to use either of those. I’m going to use a fine tip pen to draw directly on my mat, so I will still be able use my full mat for other projects.

The sticker paper I use is 8.5” x 11”. If you are using A4 your paper size will be 210mm x 297mm (8.27” x 11.69”) so you can sub those measurements for the 8.5”x11” measurements.

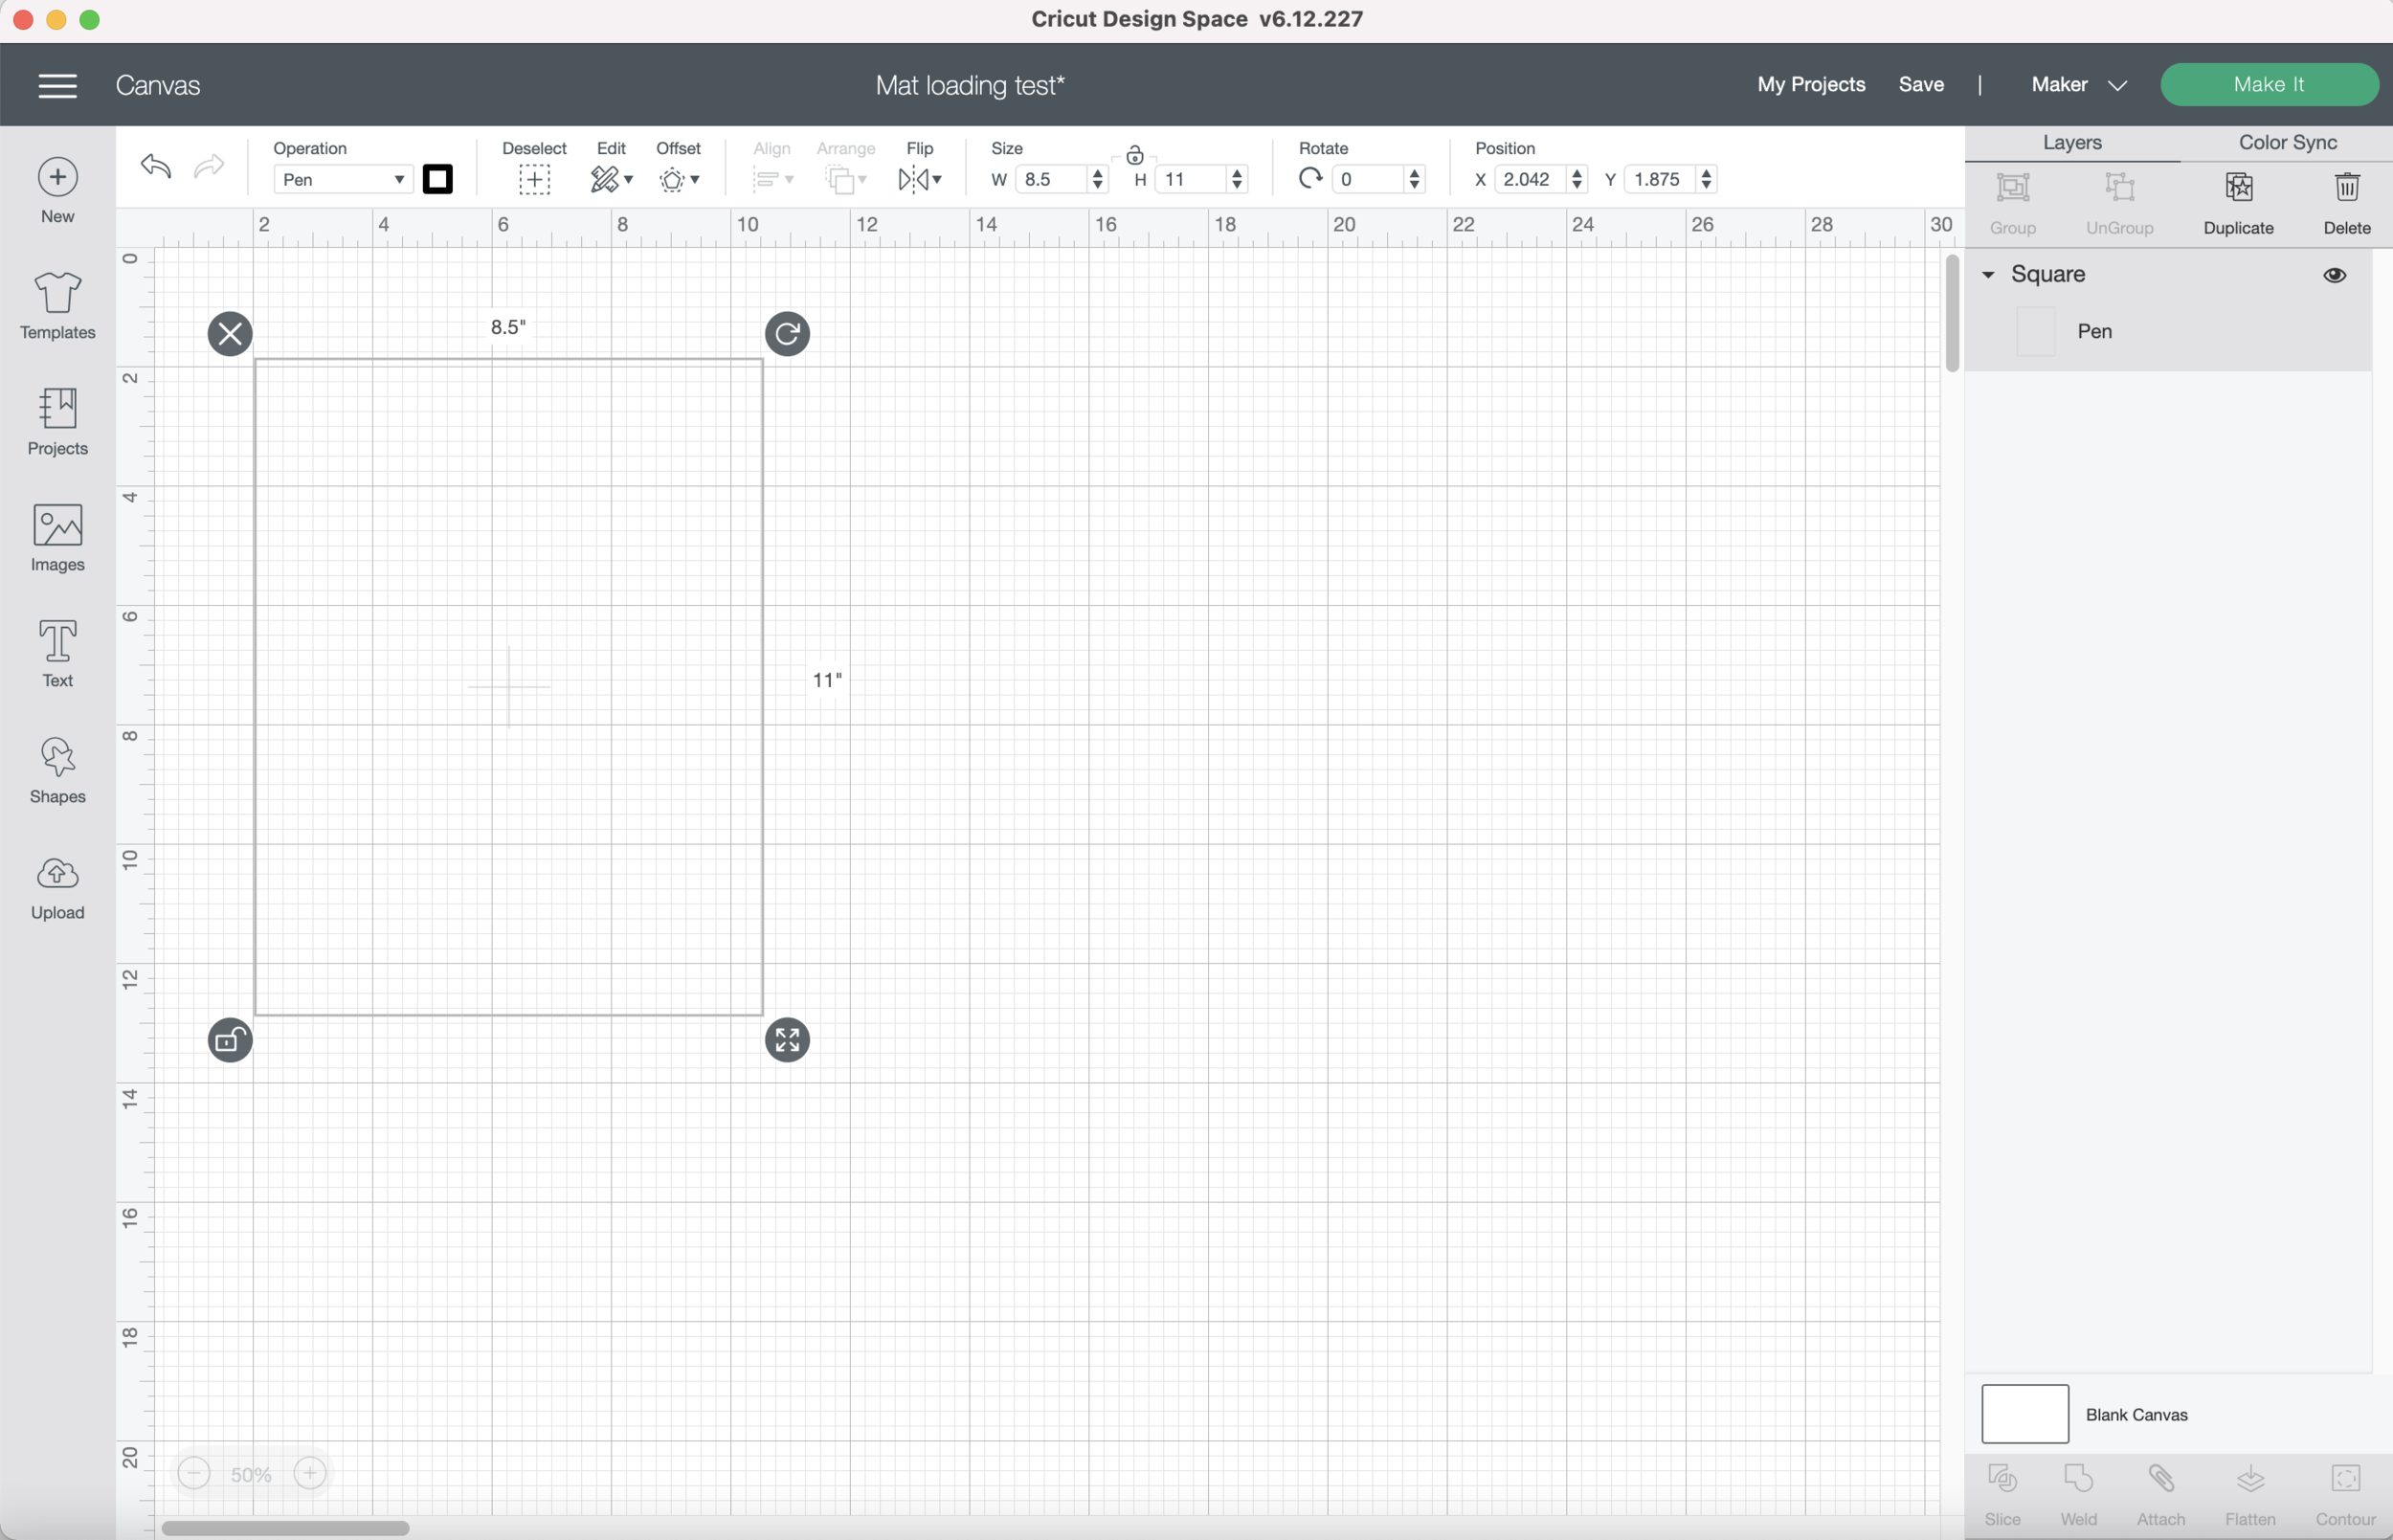
In Design Space, I’m going to create an 8.5” x 11” rectangle (8.27” x 11.69” or 210mm x 297mm if you are using A4 paper). I’m going to change the operation from “Cut” to “Draw” so I can use my fine tip pen.

Screen Shot 2021-08-29 at 3.19.56 PM.png

I’m going to press “Make it” and again, Design Space automatically puts my rectangle in the upper left corner, but there’s still that roughly 1/4” border around my mat. I’m going to keep the placement of the rectangle as it is.

My machine draws an 8.5” x 11” rectangle directly on my mat, and now we have a guide for where to place our sticker paper on the mat. Let the pen dry for a few hours or overnight, especially if you are using the Cricut brand fine tip pen, it smudges pretty easily.

Screen Shot 2021-08-29 at 8.50.04 PM.png

Next week, I’m going to do a test print to check the placement of my cut lines before I actually cut the sticker paper.