Pixscan mat

Using the Trace Tool in Silhouette Studio

Hi Everyone!

Last week I showed you how to use the Pix Scan mat with the Portrait 3. This week I’m going to go a little more in depth with how to use the trace feature in Silhouette studio to make a sticker offset. Here we go!

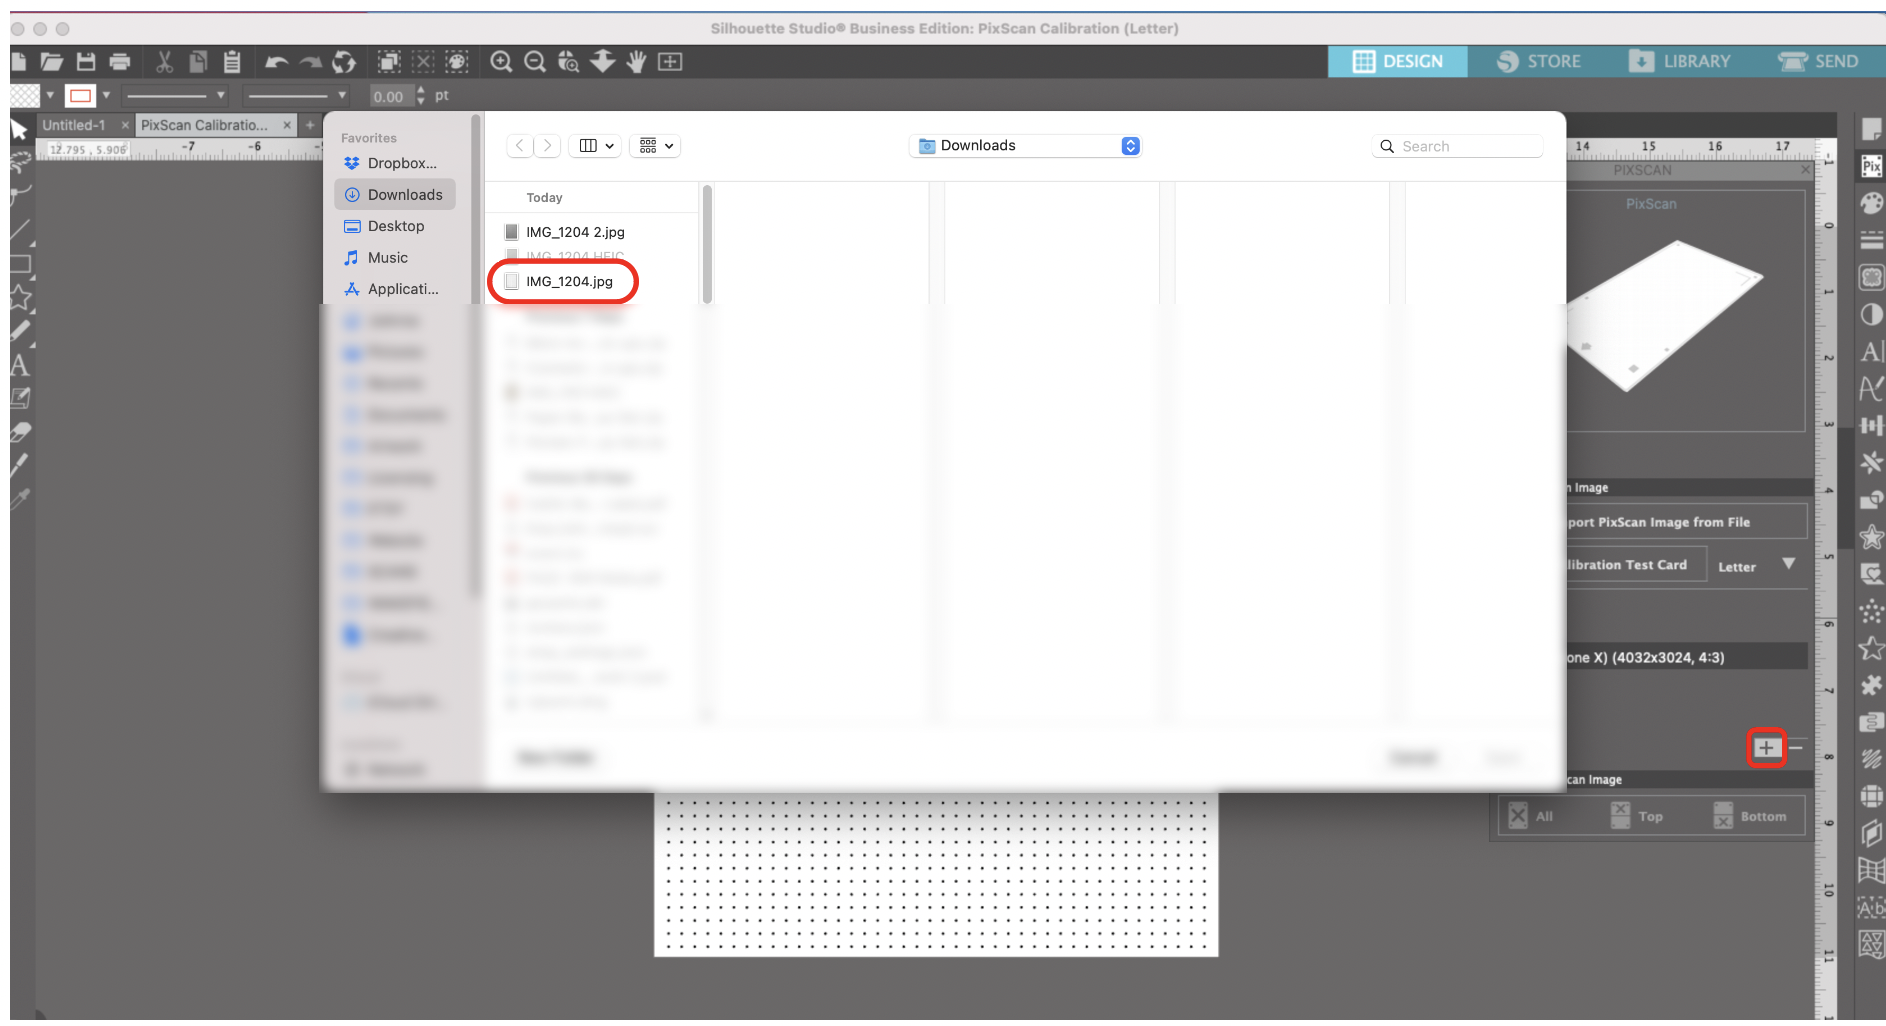
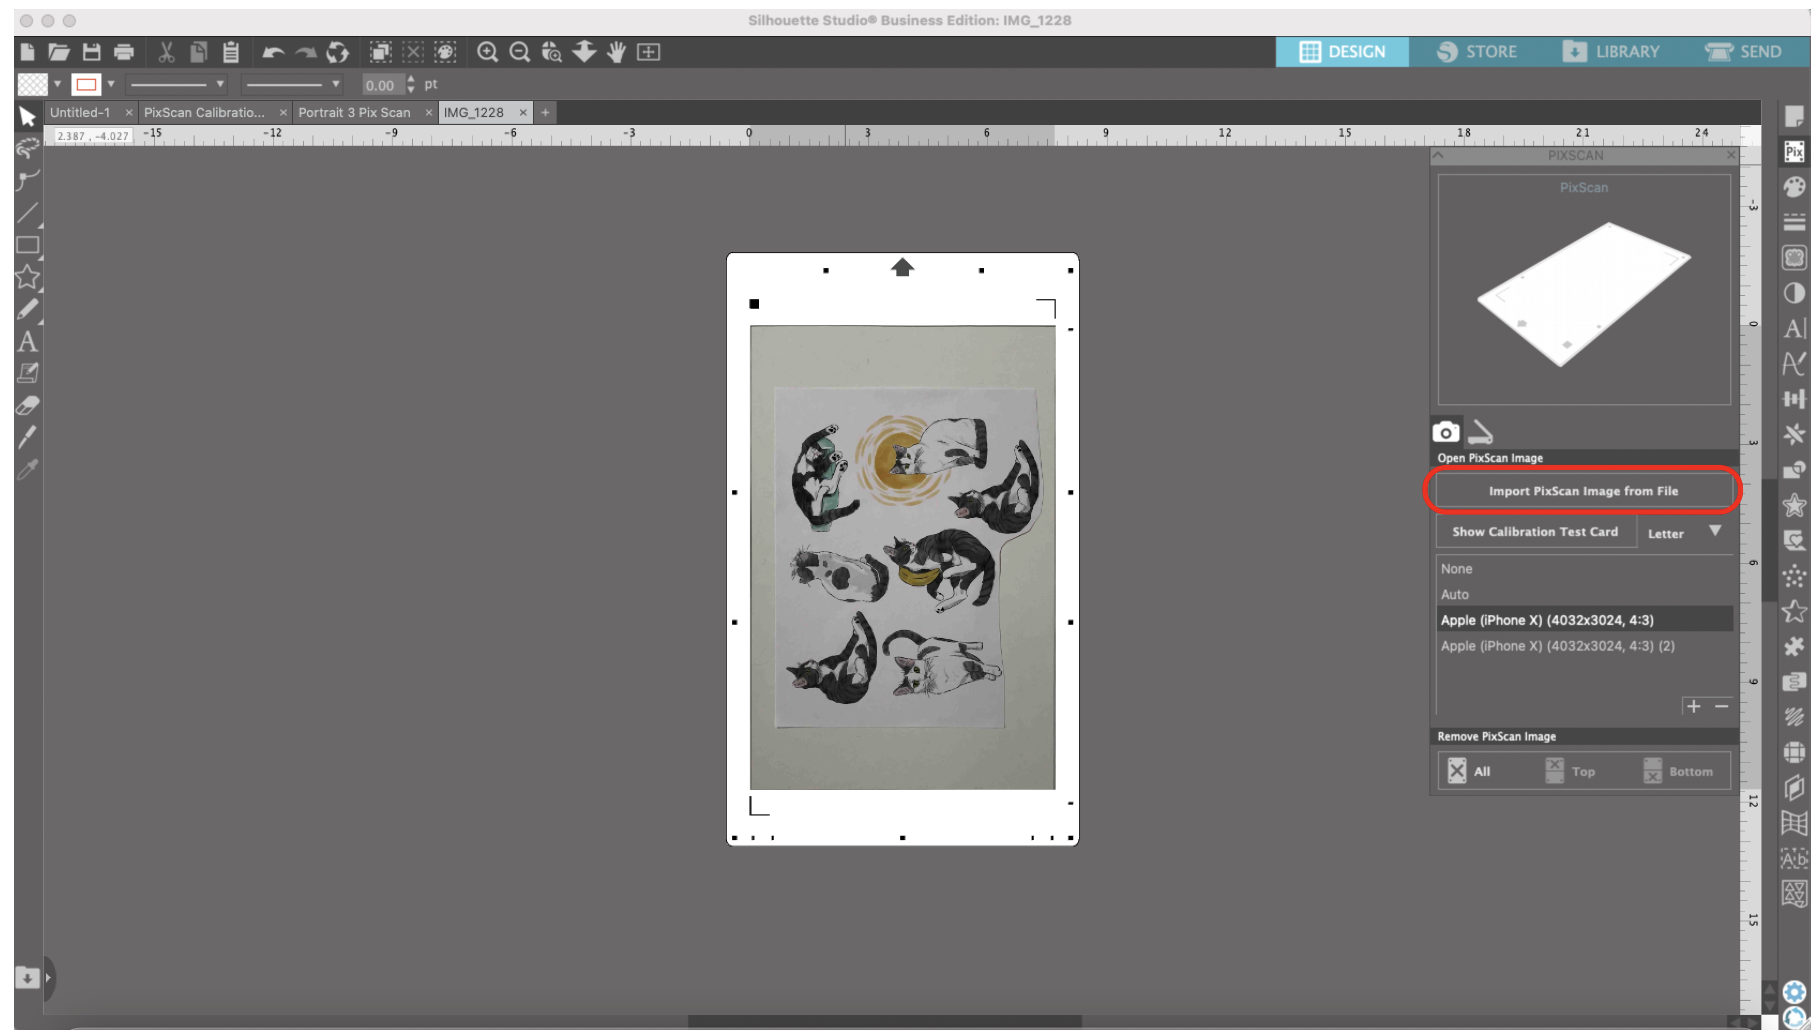
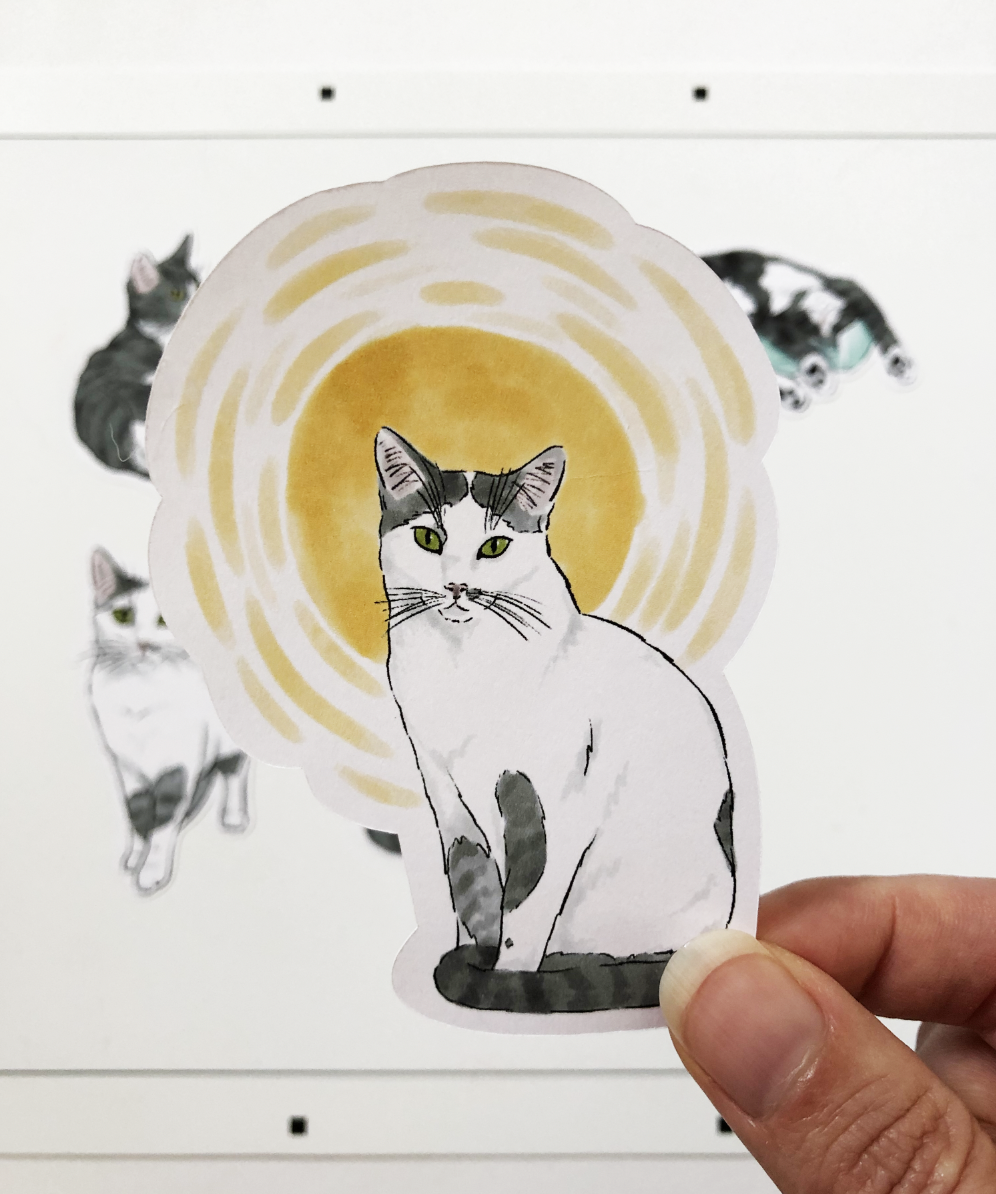
I’ve already taken a photo of the designs I’m going to use on my Pix Scan mat and imported it into Silhouette Studio.

Trace Tool Pix Scan Mat

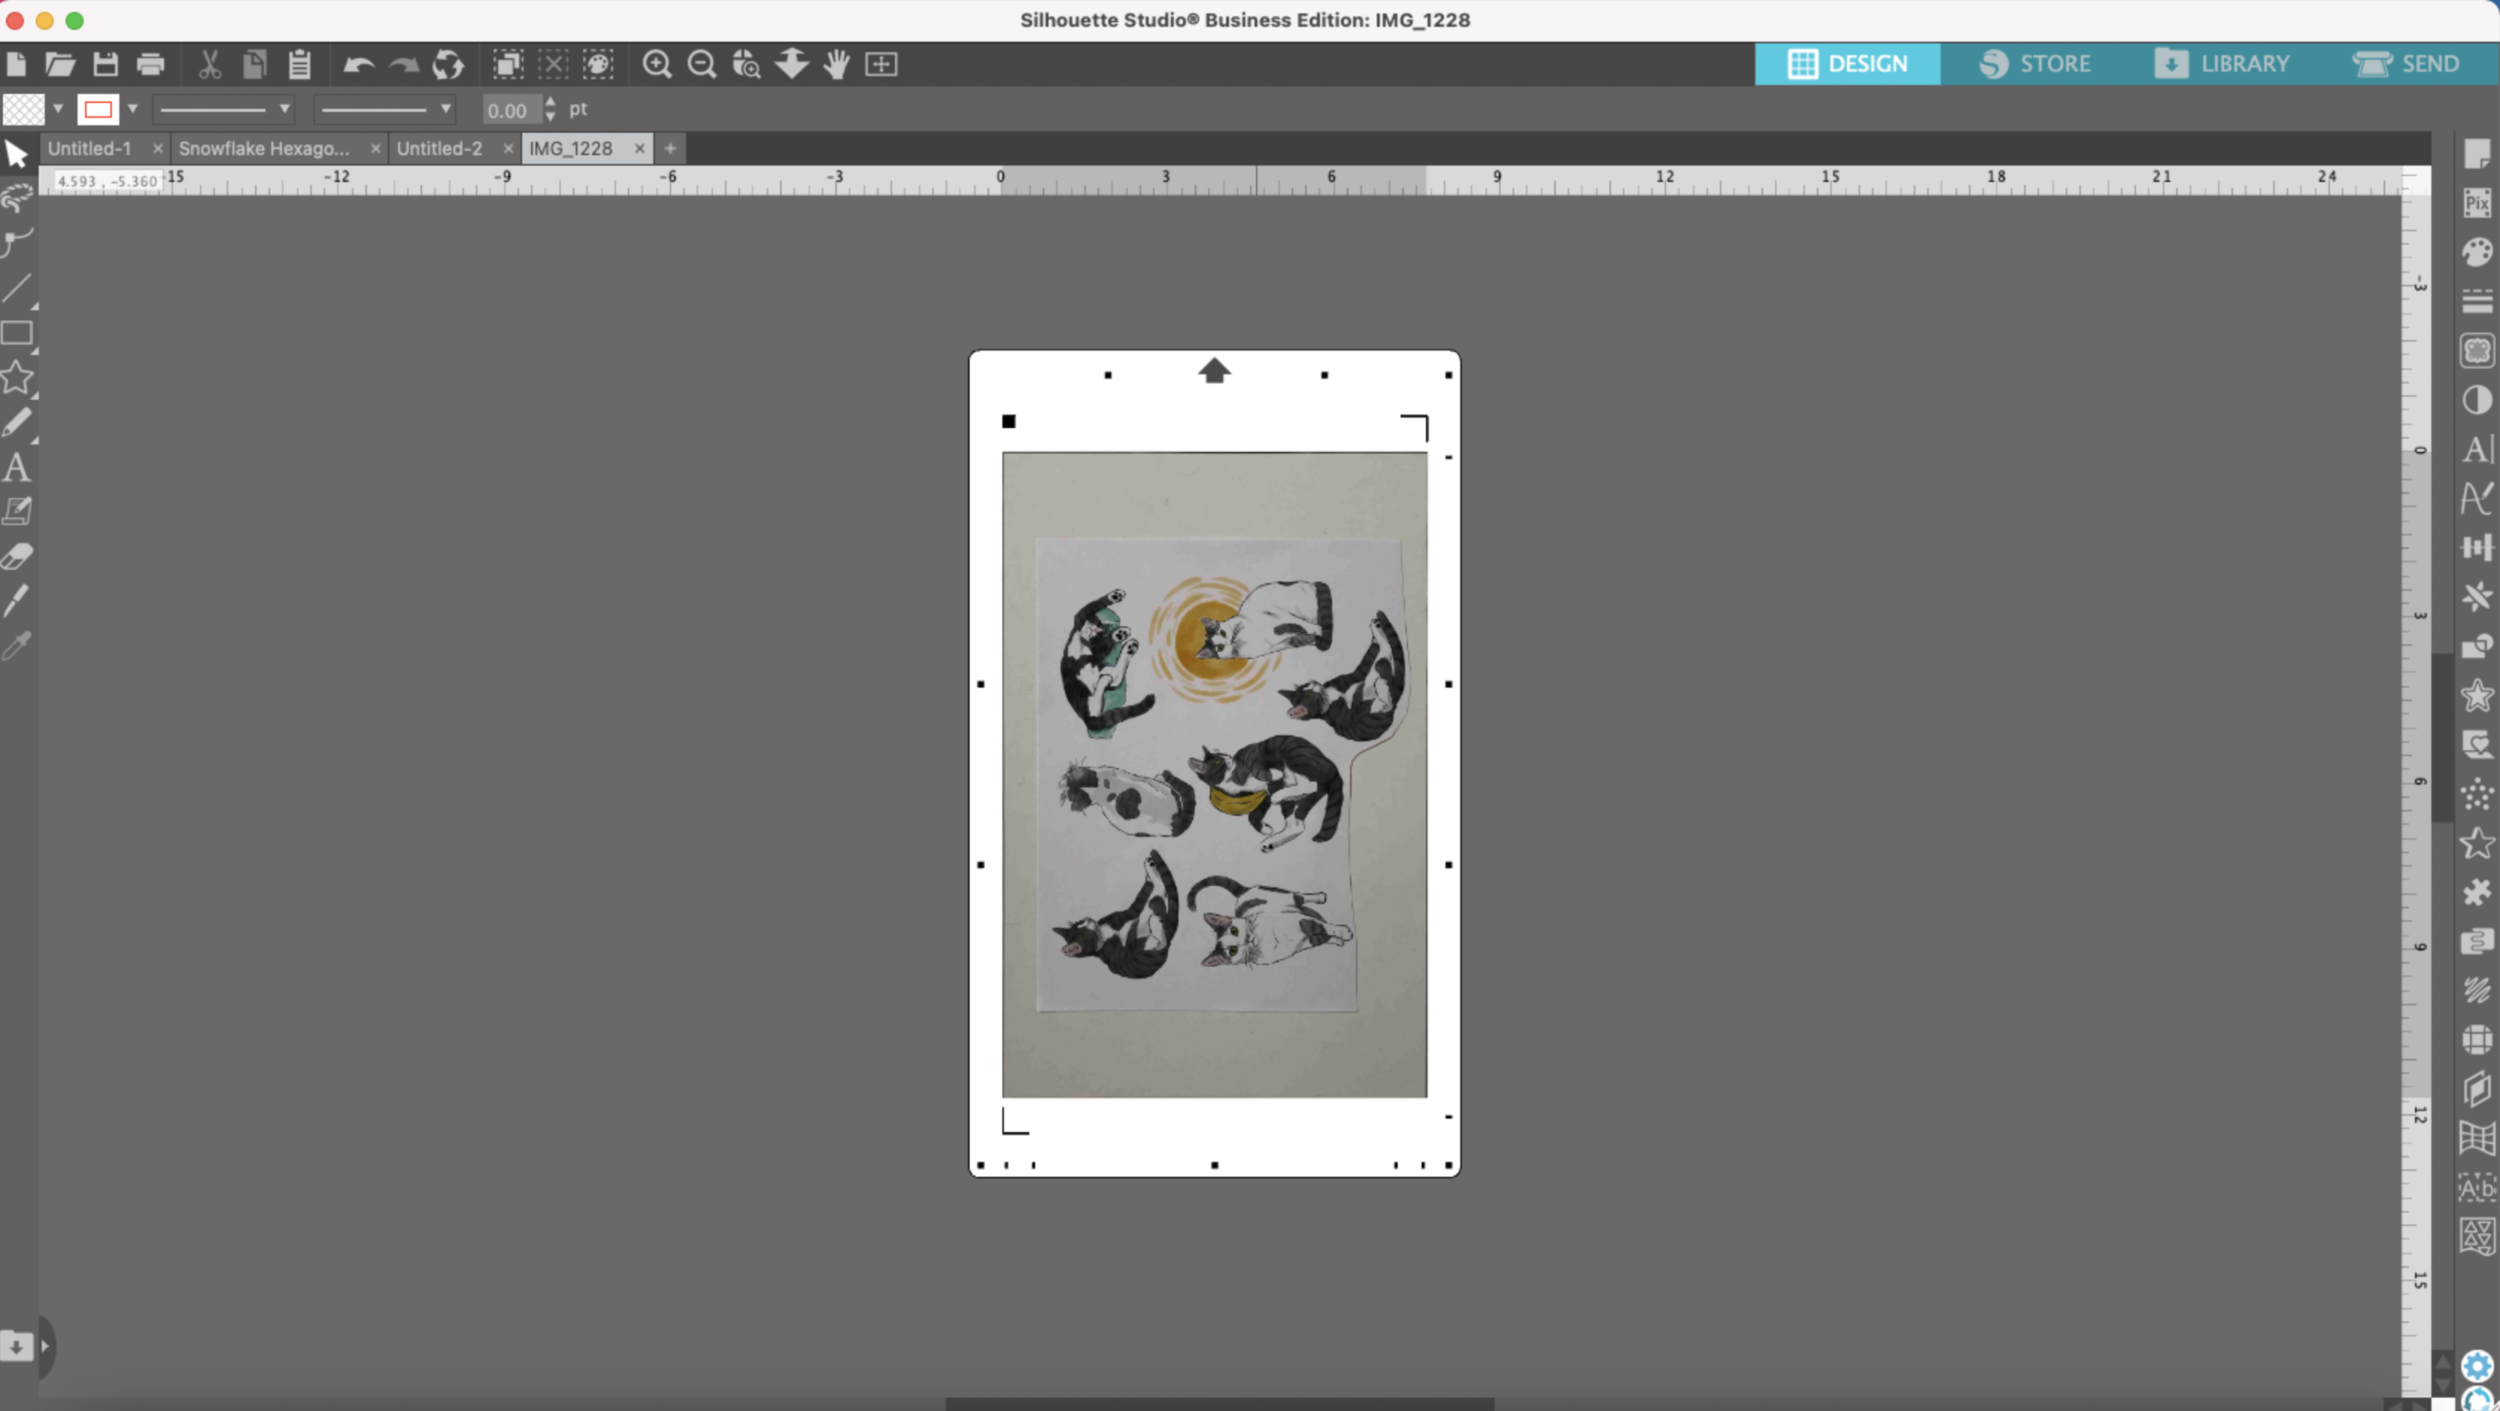
Then I’m going to zoom in the the first little kitty that I’m going to trace and I select the Trace tool from the little toolbar on the right hand side of my screen. It kind of looks like a little butterfly.

Trace Tool Pix Scan Mat

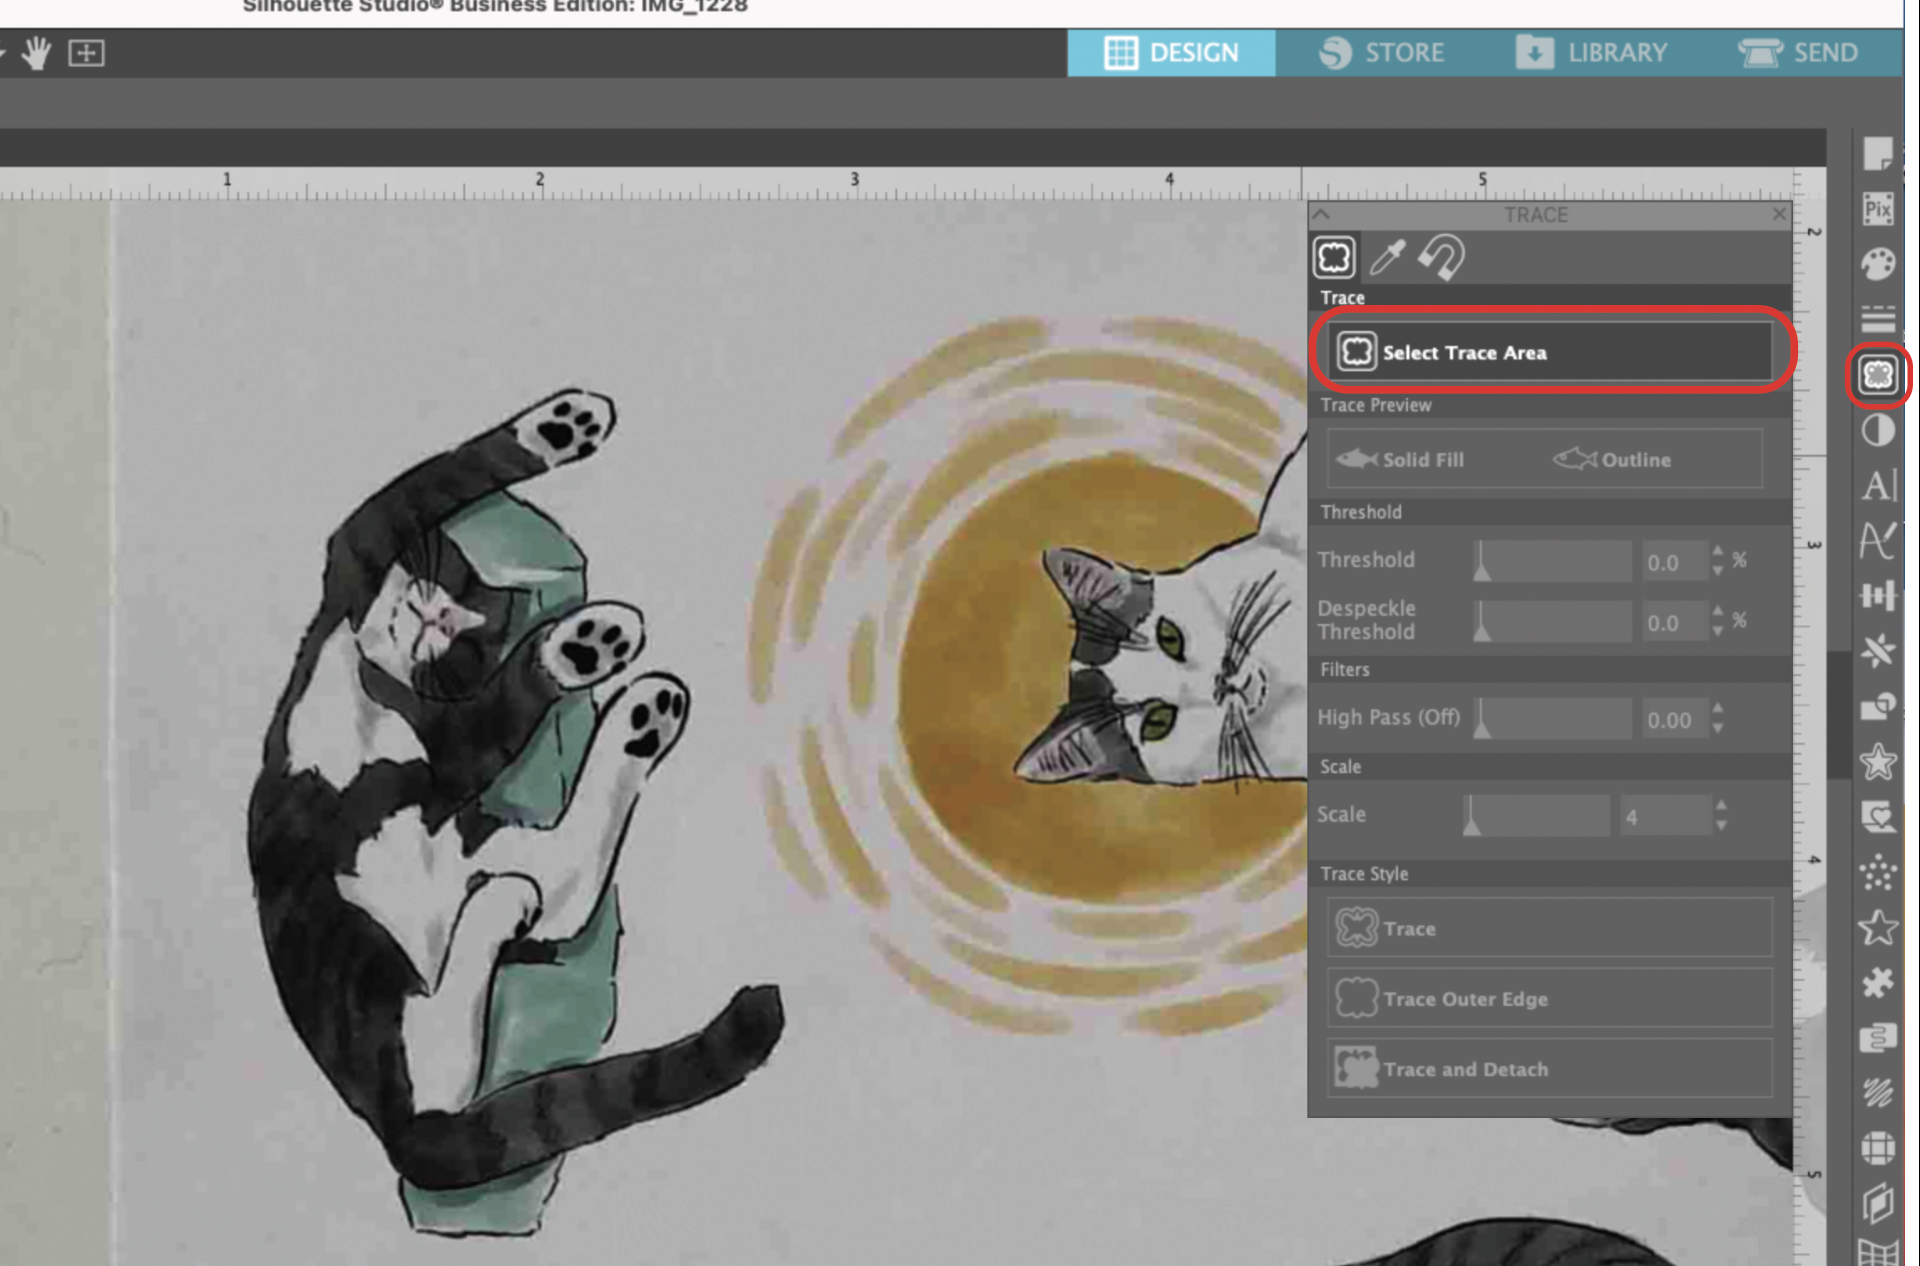
Next, I click on “Select Trace Area” from the Trace tool dialog box. I draw a rectangle around the kitty I want to outline. I have “Solid Fill” selected in the Trace tool dialog box so the area I’m trying trace is easier to see.

Trace Tool Pix Scan Mat

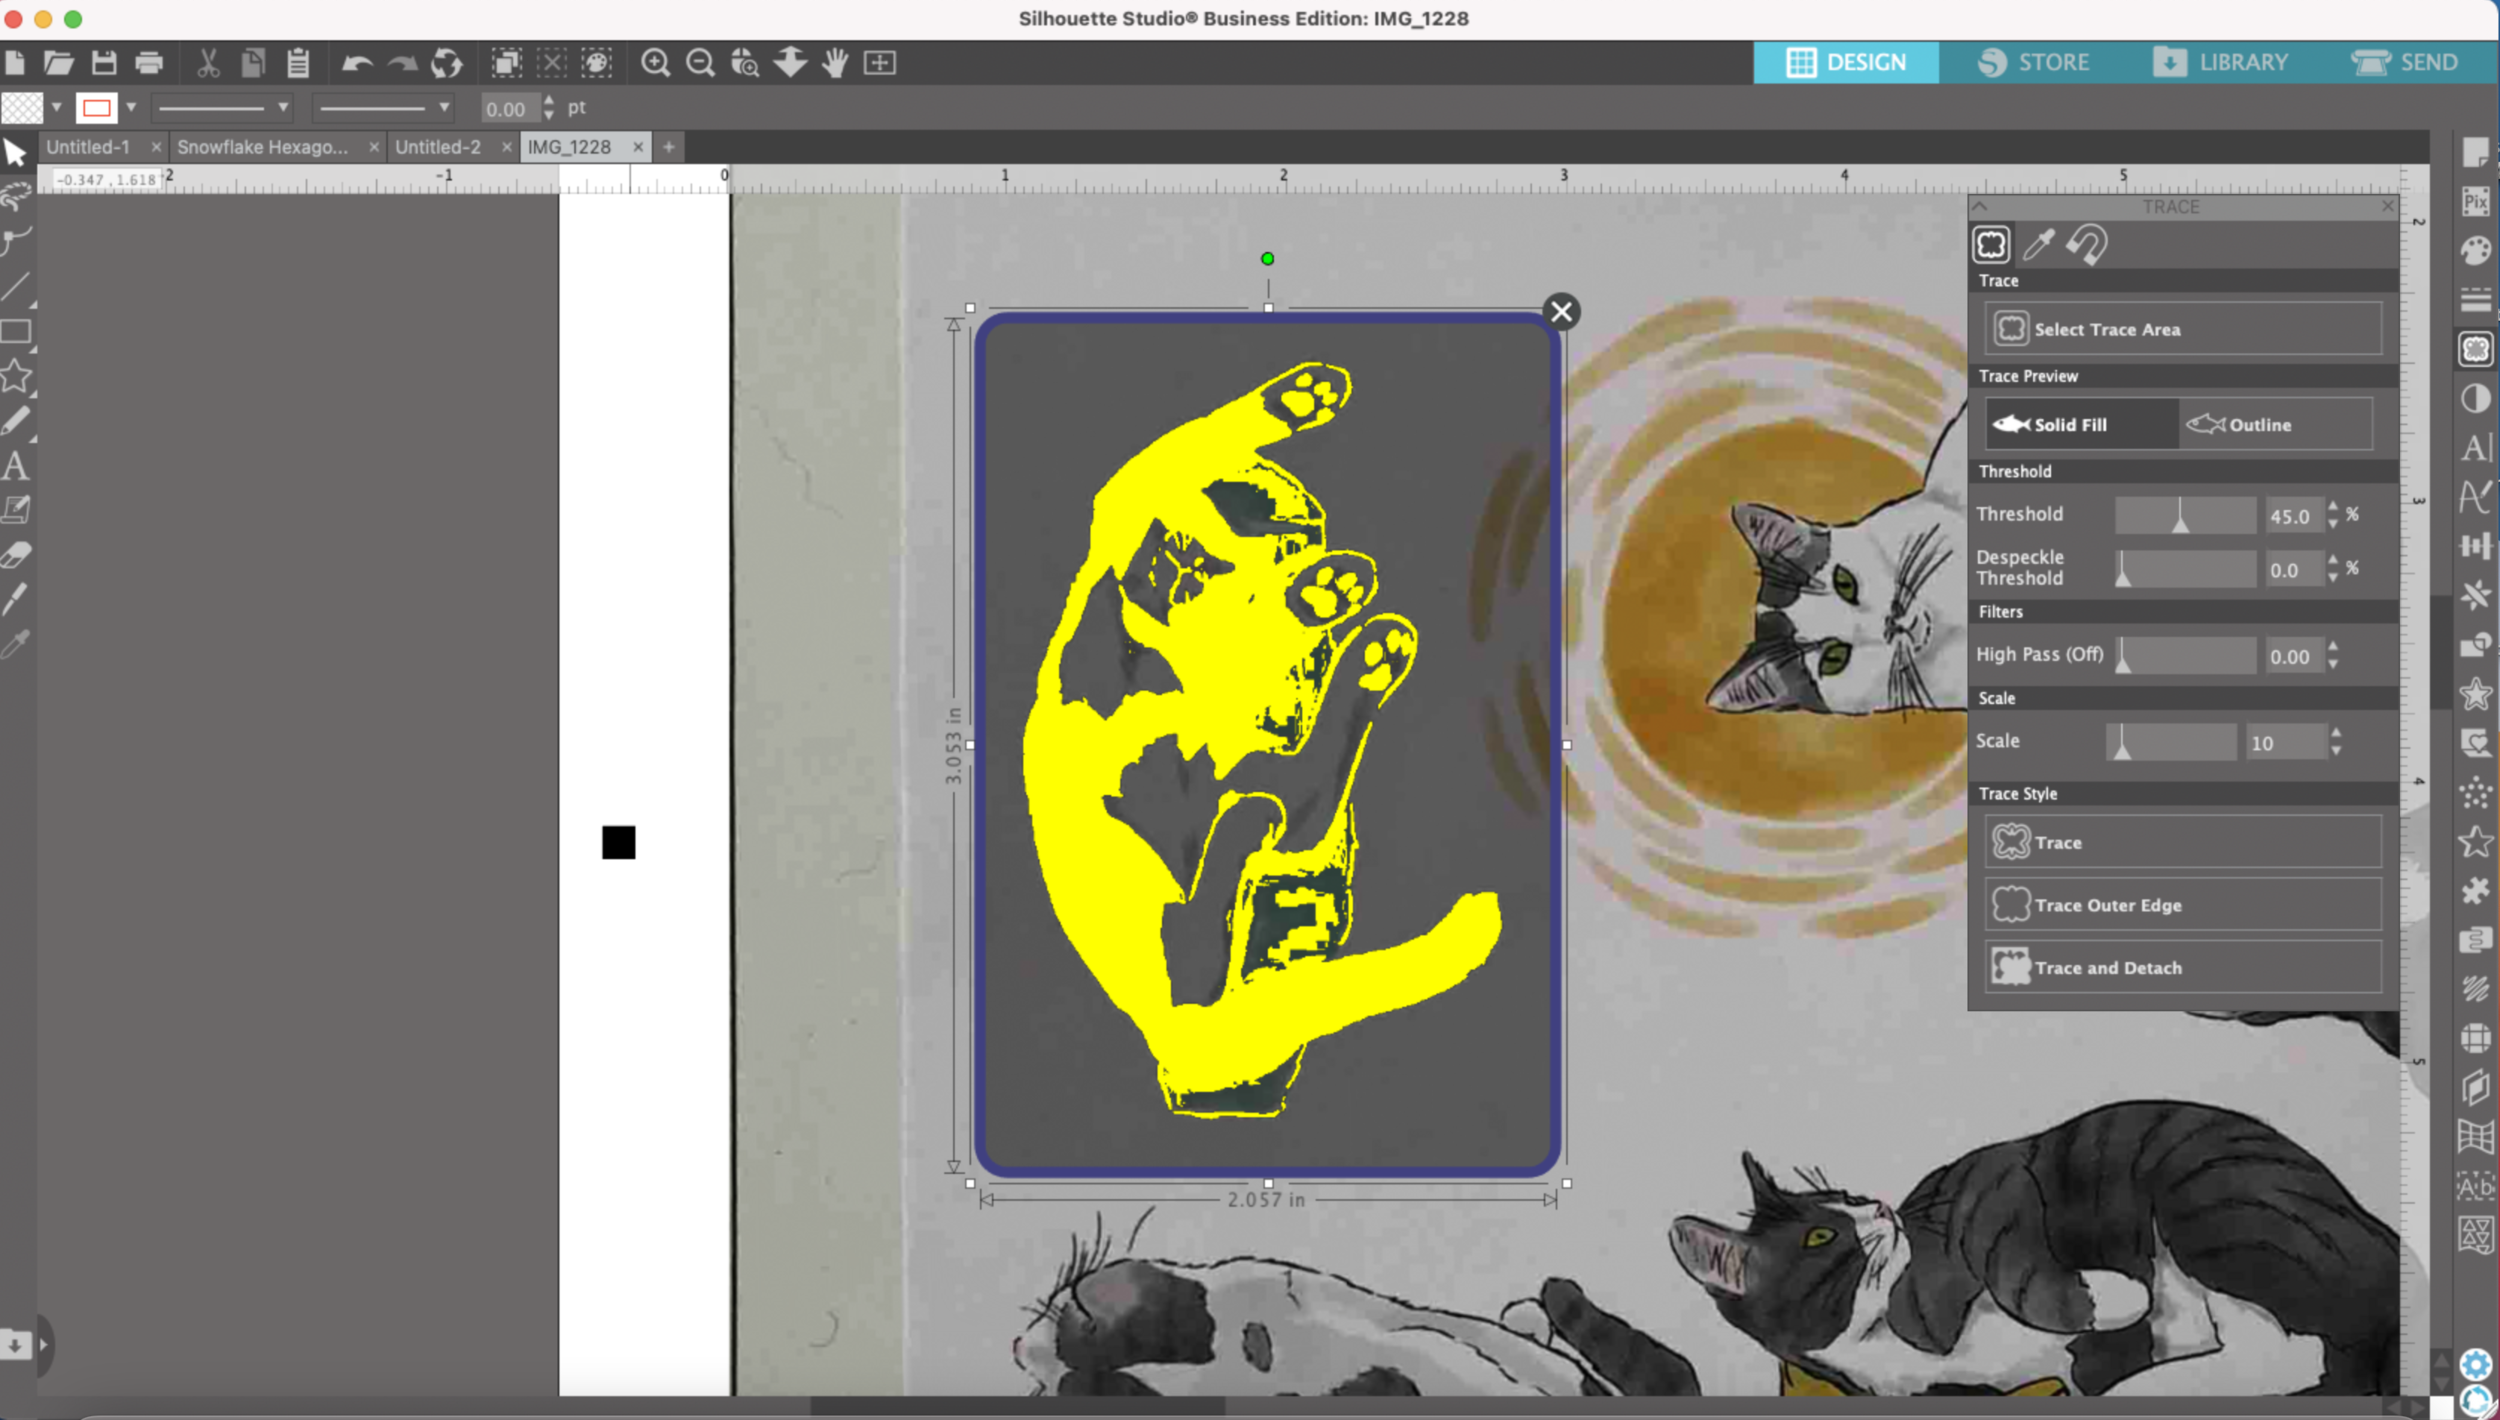
I use the Threshold slider to try to get him little more filled in with the yellow, I’m really trying to get my outer edges completely yellow, there are some small gaps but we’ll fix those later.

Trace Tool Pix Scan Mat

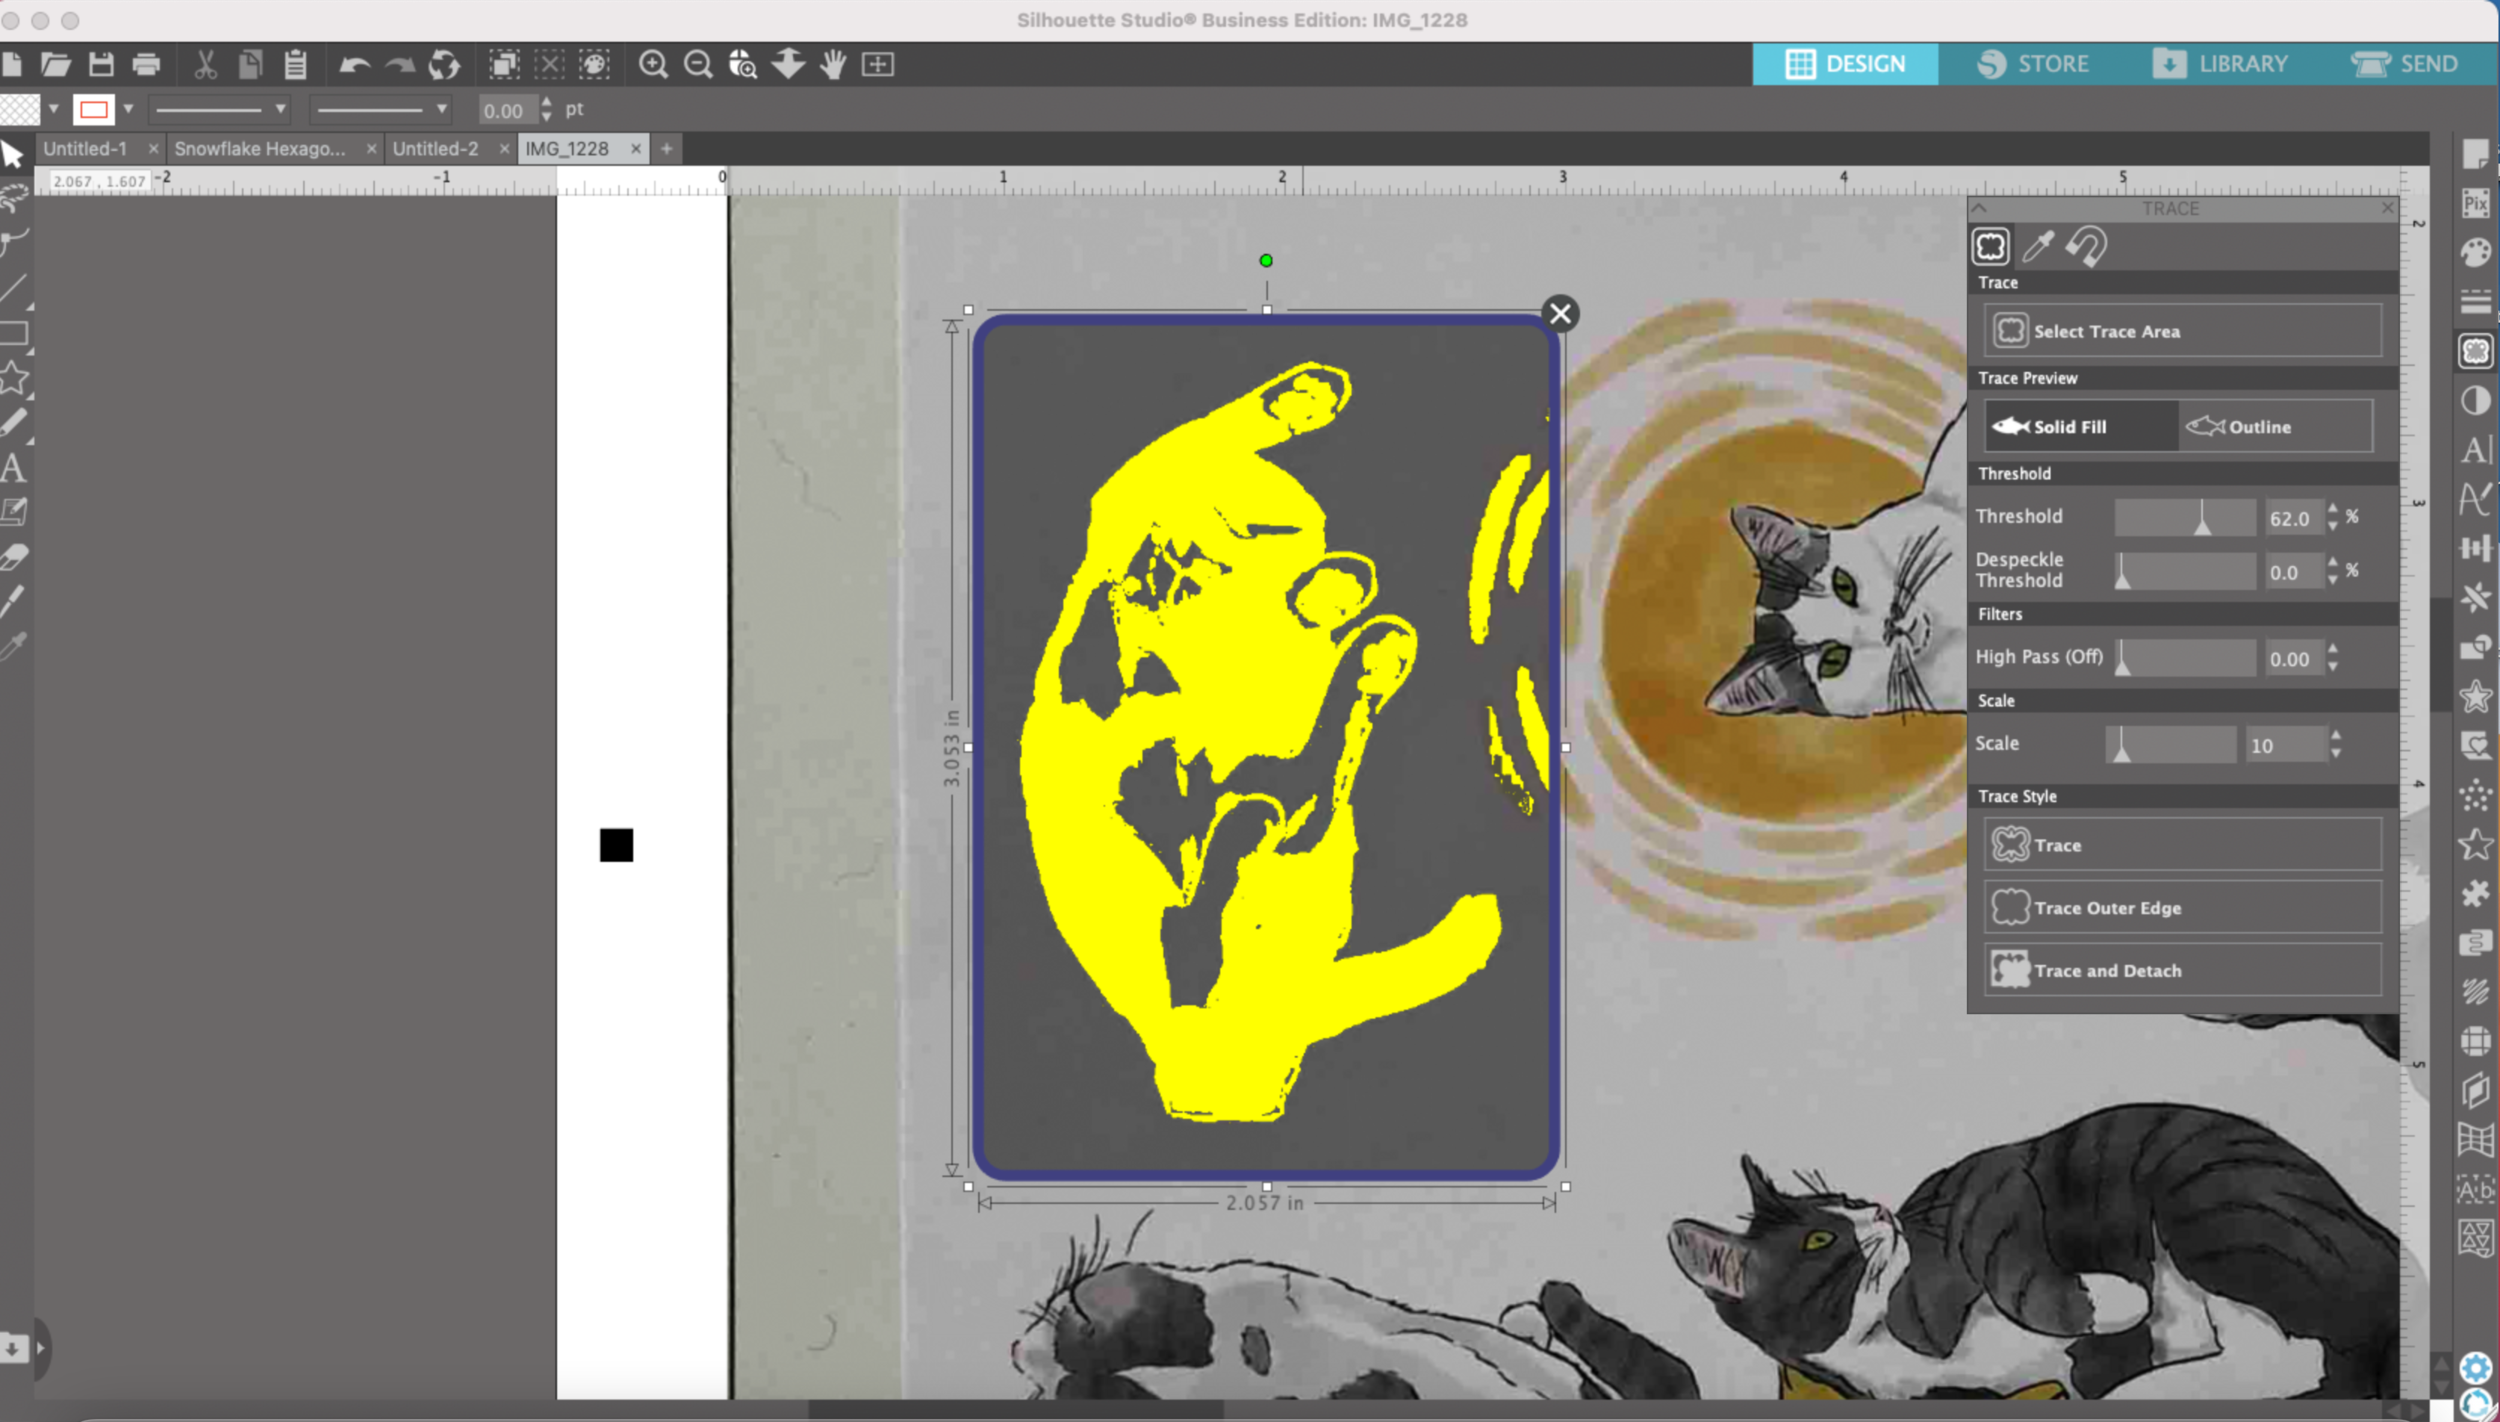
Once I get the yellow area to my satisfaction, I select “Trace Outer Edge.” Then it shows me red cut lines around the area that I just traced.

Trace Tool Pix Scan Mat

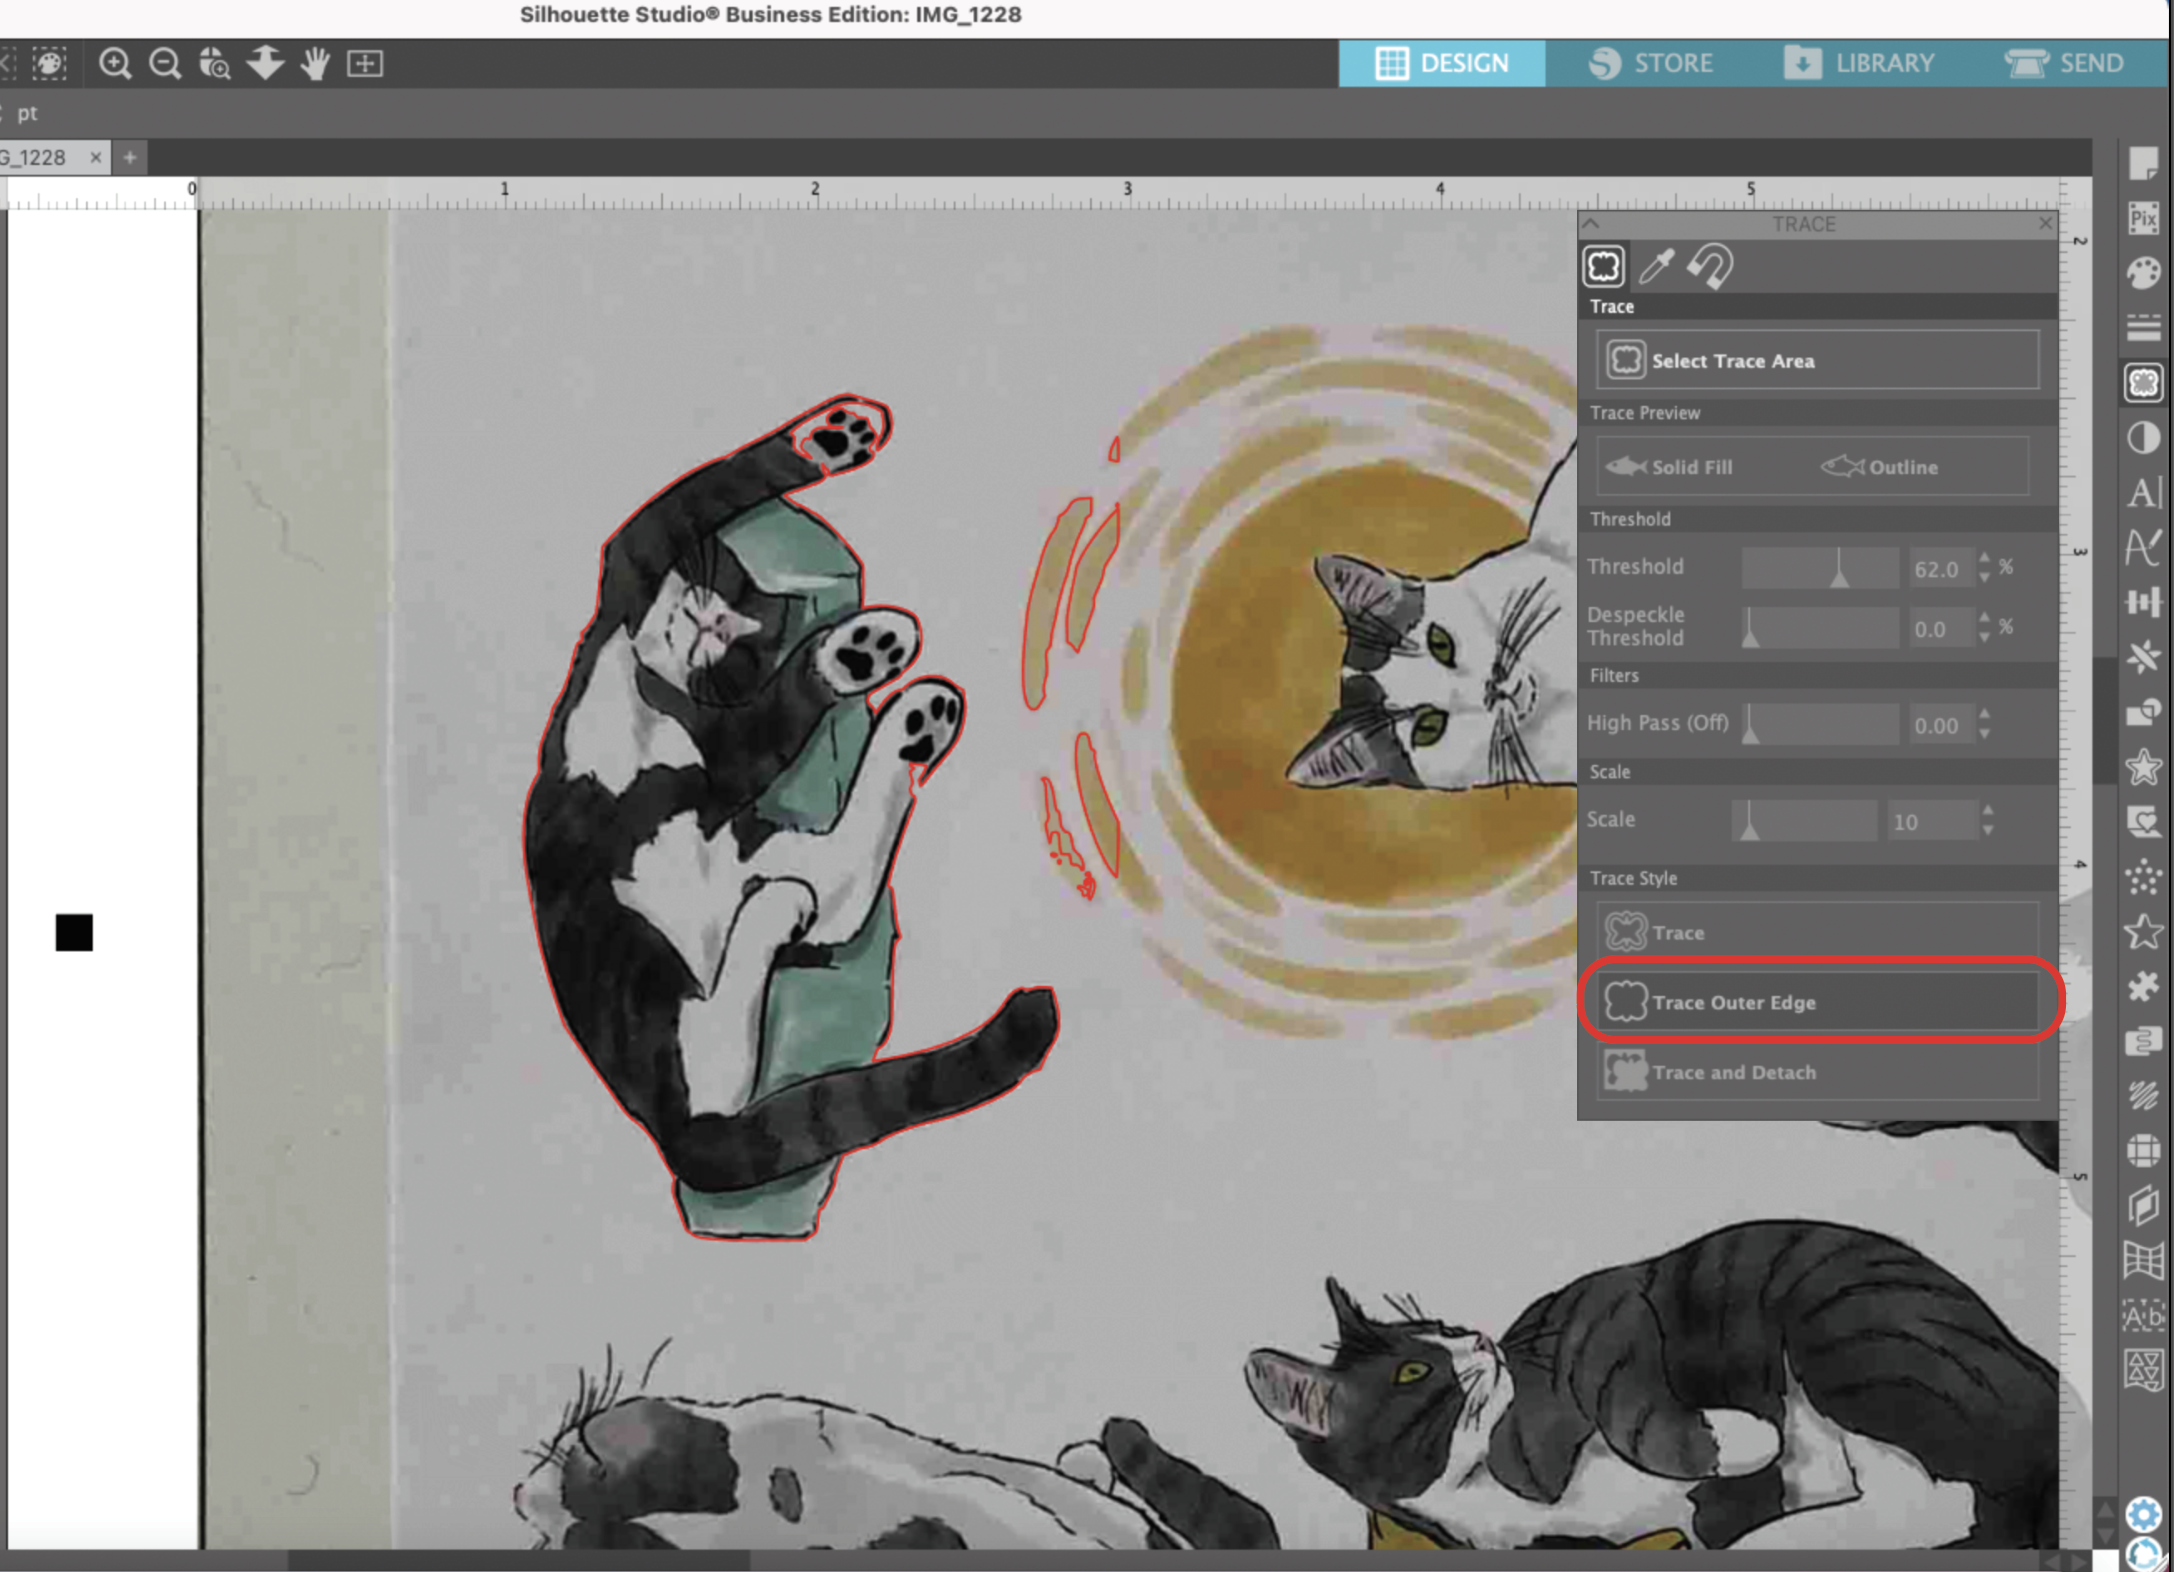
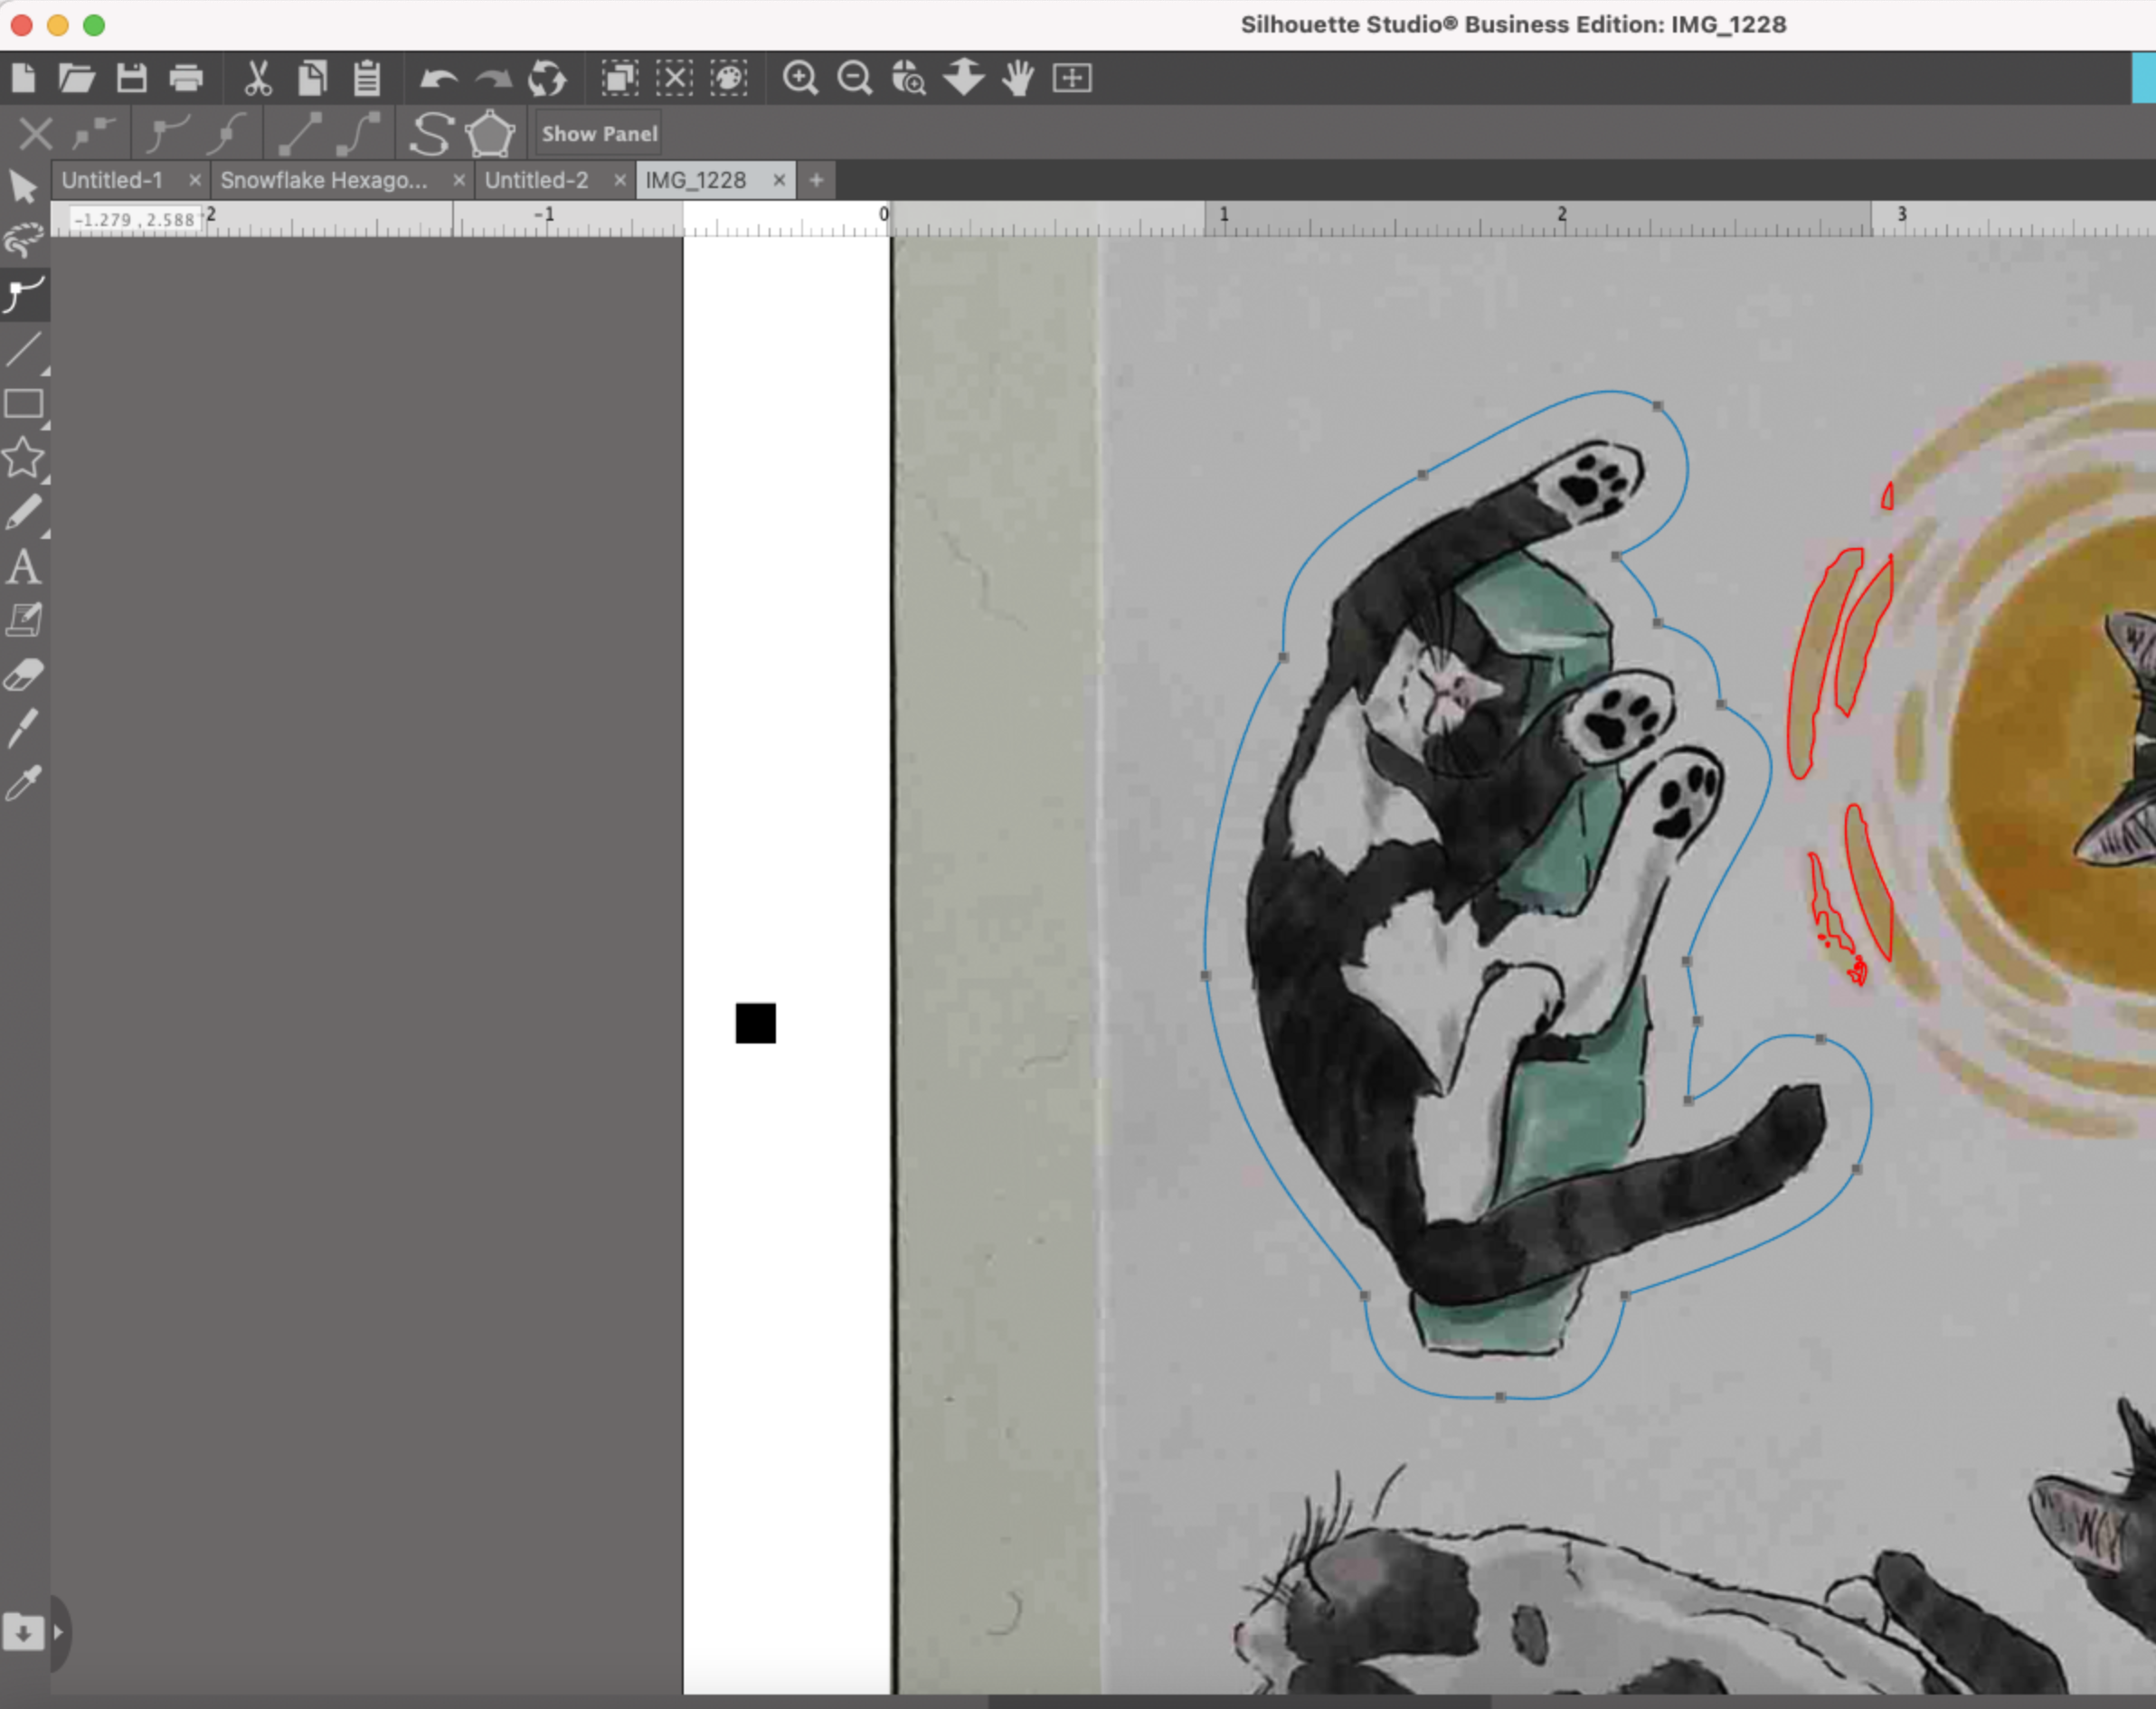
Now I need to do a little clean up since my outer edges didn’t quite get the whole outline of the kitty and there are some areas from another sticker that got selected.

Using the Arrow from the left hand side tool bar, I select the red lines. I’m going to release the Compound Path.

Trace Tool Pix Scan Mat

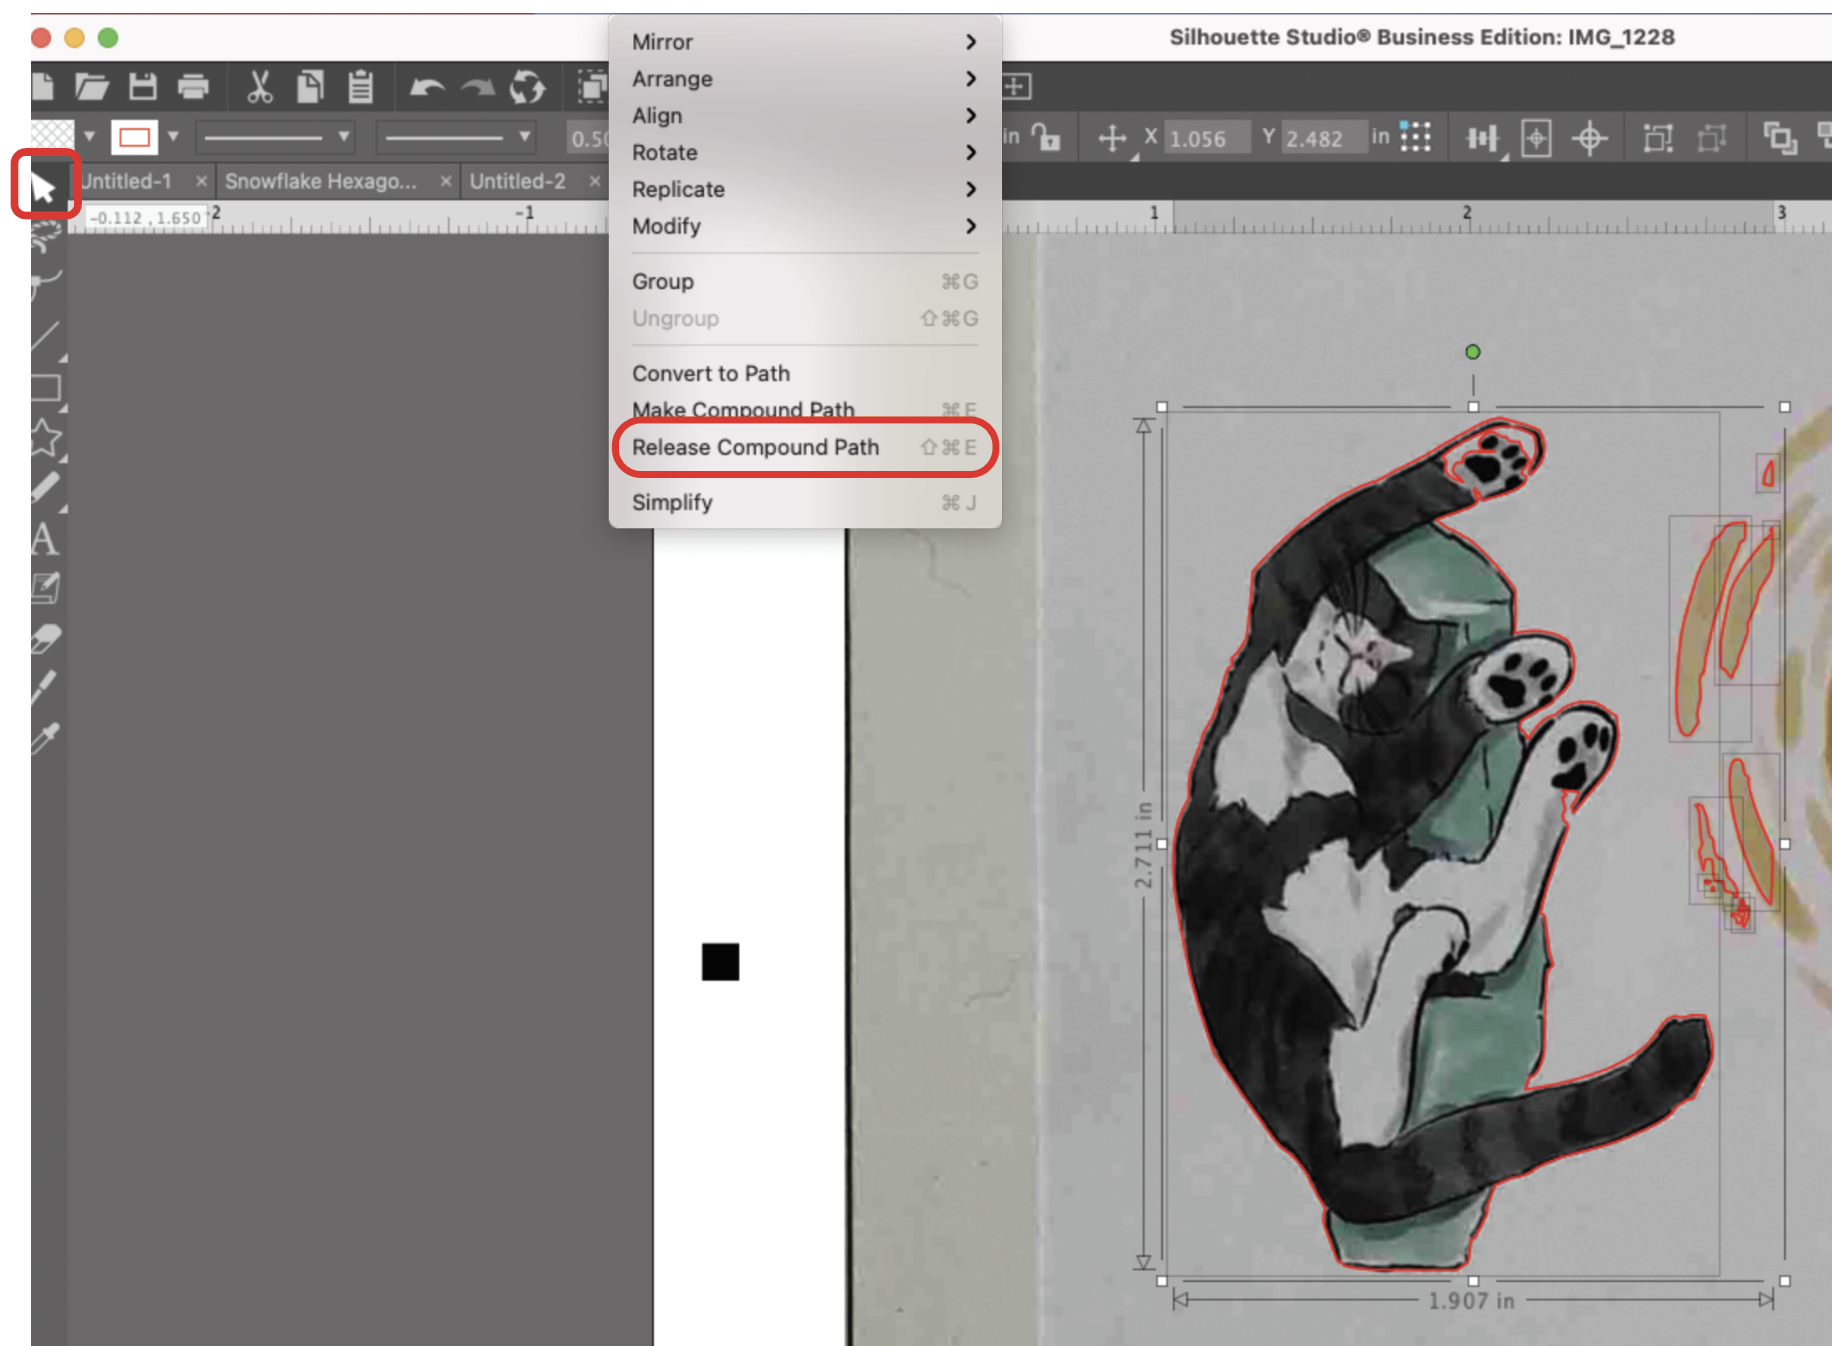
Then I’m going to select the red line that goes around the outer edge of the kitty and change the line color to blue (you can use any color, I’m just using blue because it’s easy to see).

Trace Tool Pix Scan Mat

Now I’m going to make the offset. Select the little star from the tool bar on the right hand side. I’m going to make an outer offset at 0.125”. Then click Apply.

Trace Tool Pix Scan Mat

I’m going to delete the inner blue line. Then I’m going to smooth out the offset a little bit using the smooth tool.

Trace Tool Pix Scan Mat

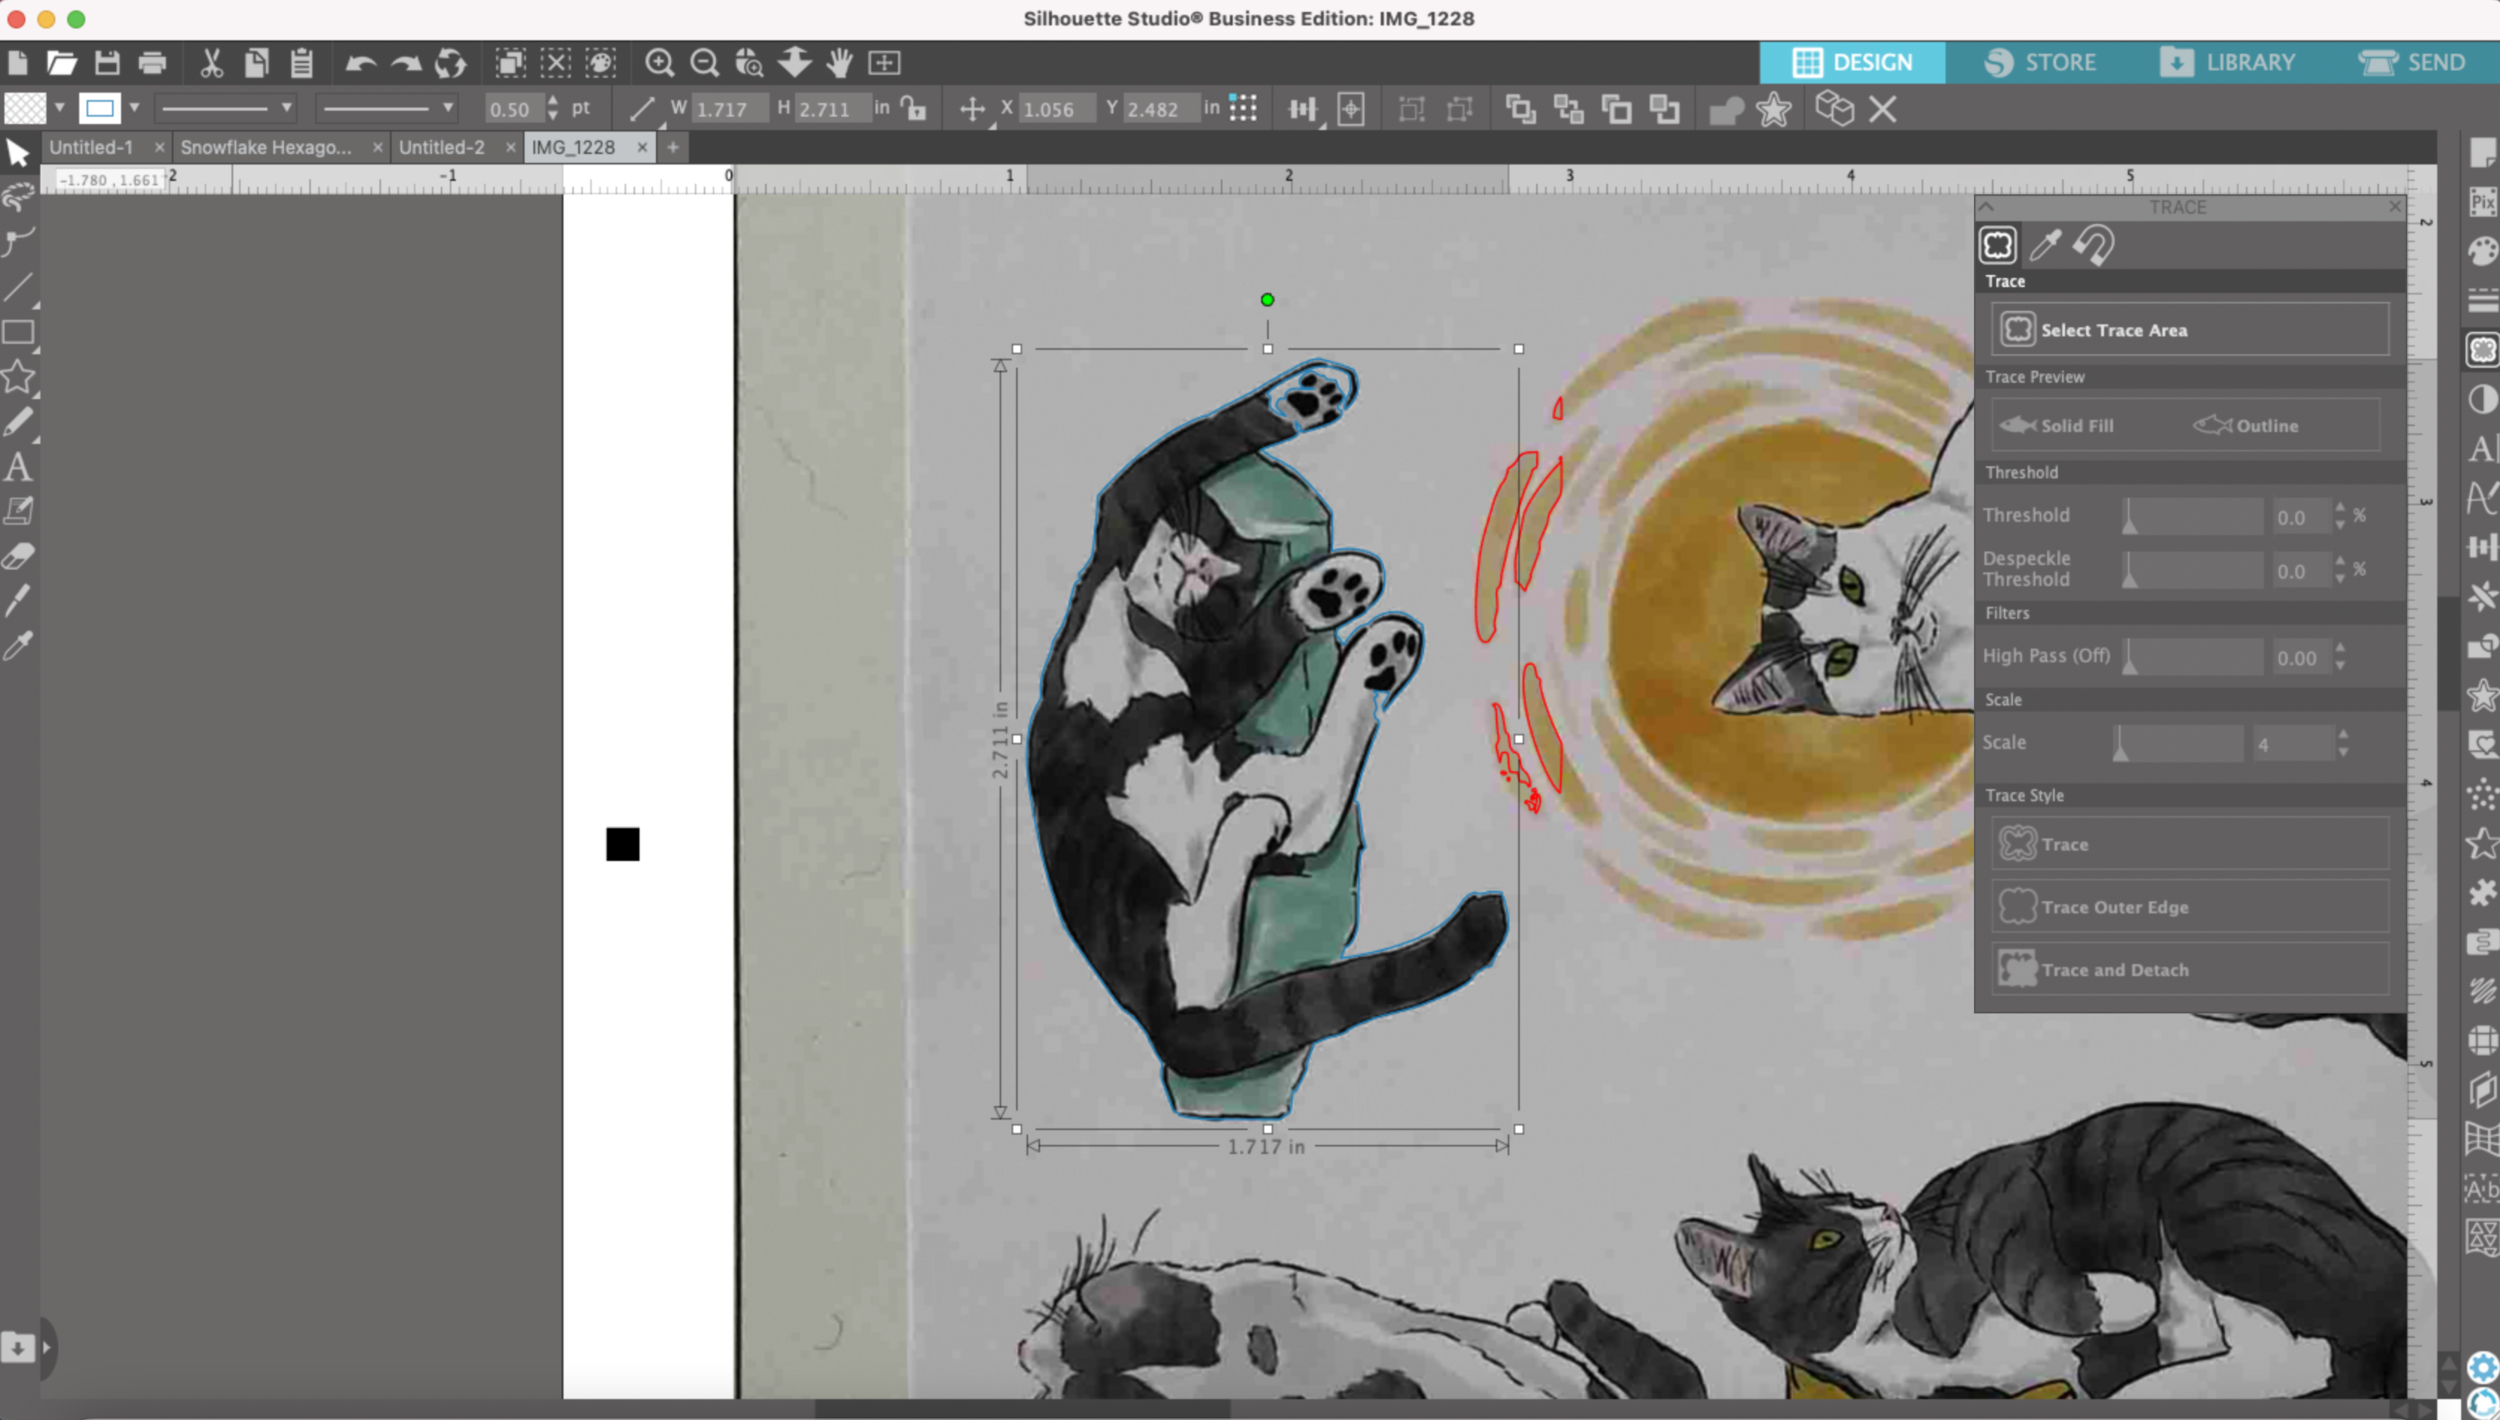
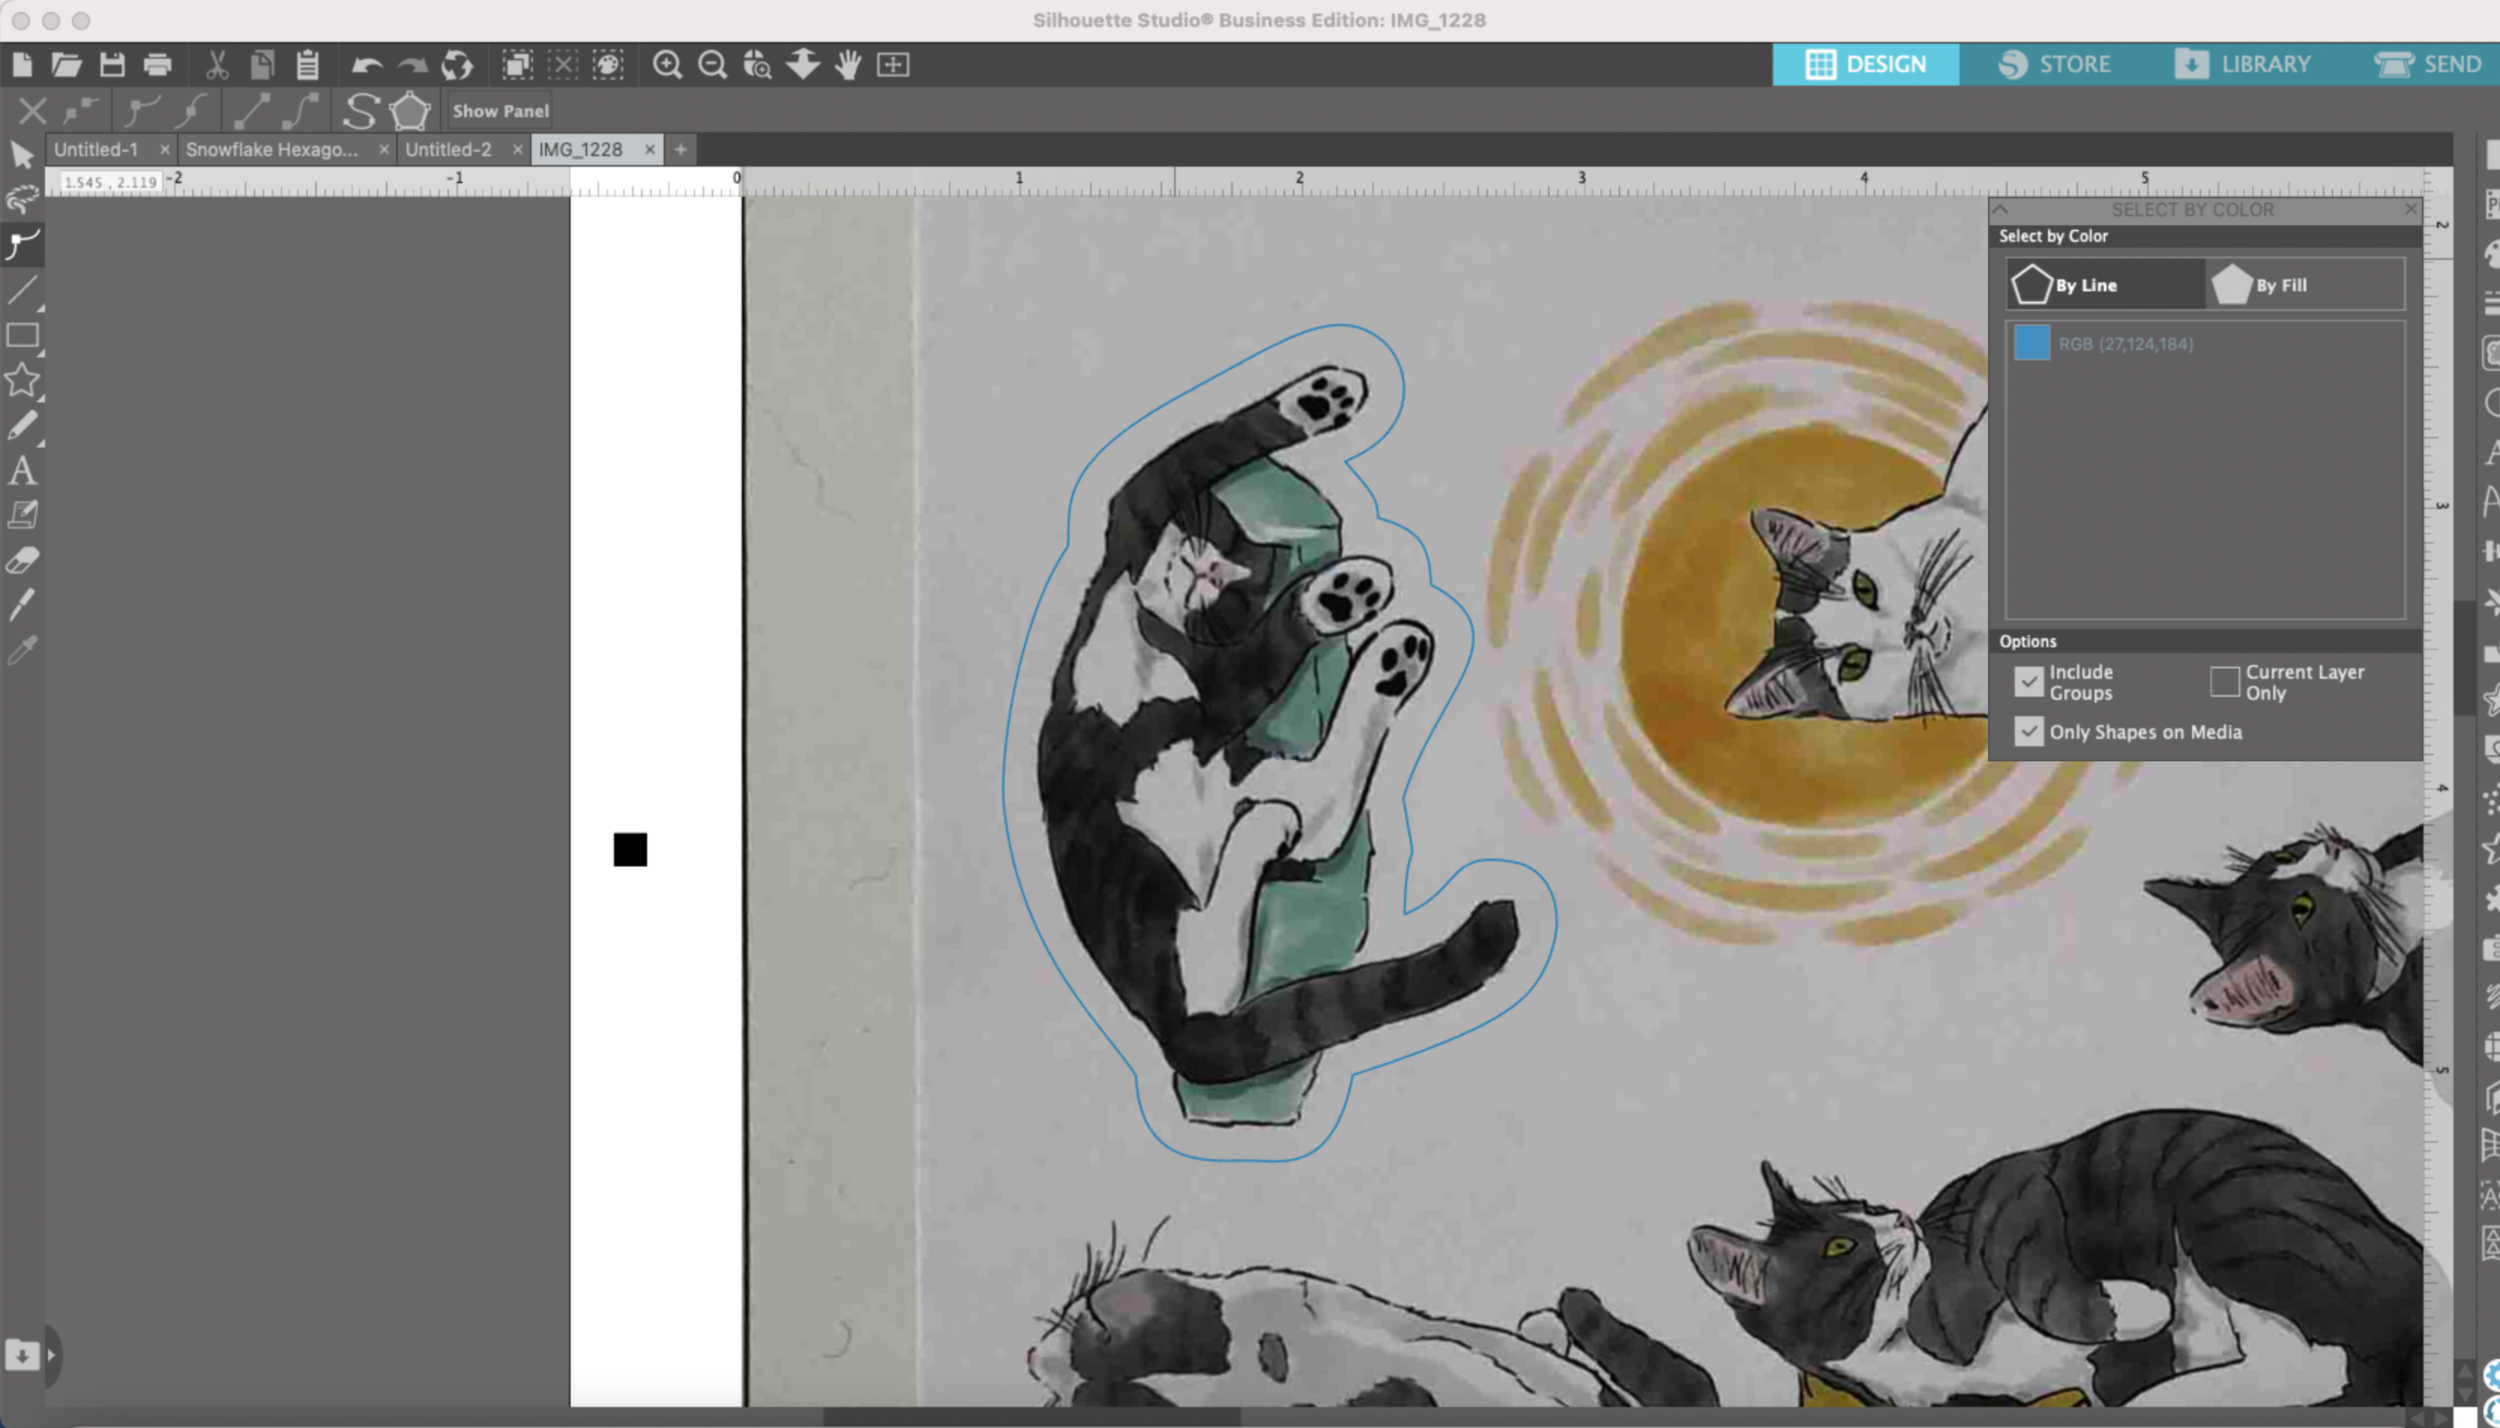
Next, I’m going to get rid of the red outlines that are part of the other sticker. I could click each individual piece to get rid of it, but instead I’m going to use the “Select by Color” feature.

In the tools bar that goes across the top edge, I select the little paint palette with the dotted line around it. In the dialog box I have “By Line color” selected. Then I click on the red and it selects everything with a red outline.

Trace Tool Pix Scan Mat

I click delete and now all of the red lines are gone!

Trace Tool Pix Scan Mat

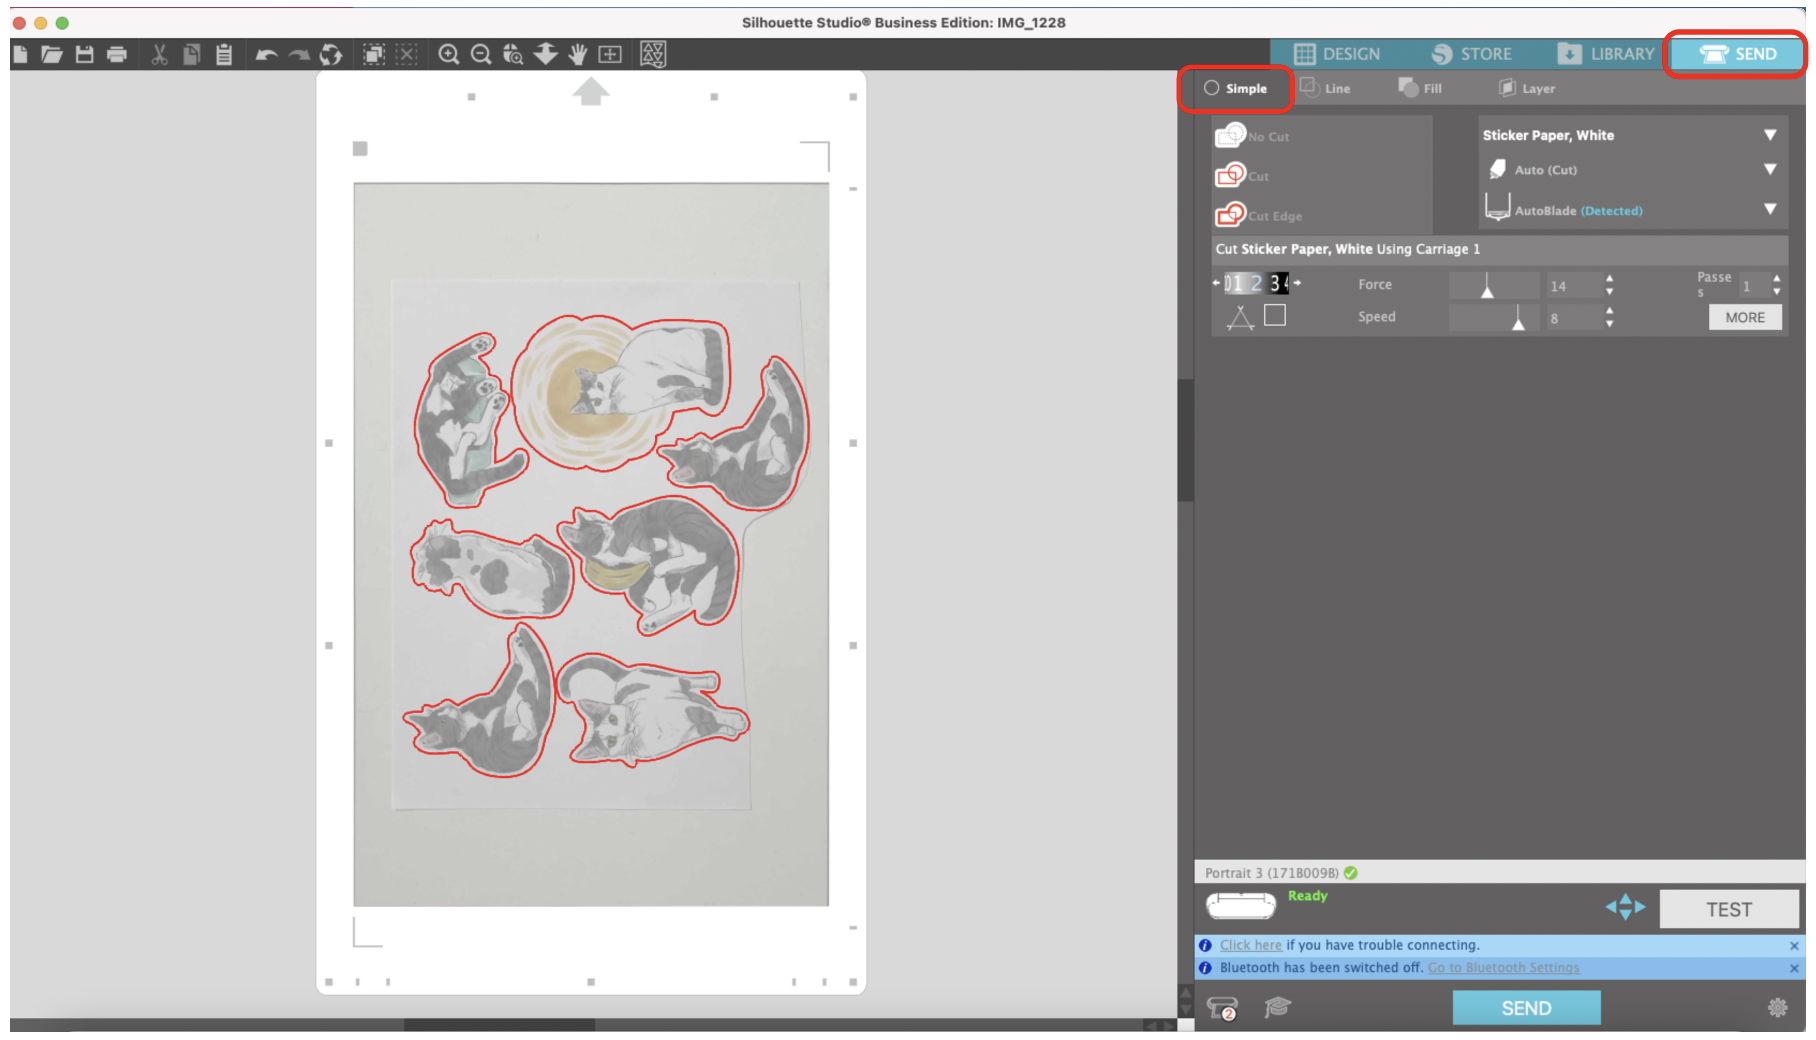
I repeat the same process for the other images on my mat. One thing I love about Silhouette Studio is I can can save my cut lines and use them for the next sheet of stickers too!

Using the Silhouette Portrait 3 Pixscan Mat to Cut Stickers

Hi Everyone!

This week I want to share another favorite accessory for my Silhouette Portrait 3, the Pixscan mat! It’s super helpful for cutting stickers or things you may have already printed and now you want to cut them.

First, if you haven’t done so already, you will need to calibrate whatever camera you care going to use. I’m going to be using my iPhone X.

Open Silhouette studio. I currently have not mat selected. I’m going to the little PIX icon on the toolbar to the right of Silhouette Studio.

Click on “Show Calibration Test Card.” A page full of little black dots will pop up.

Pix Scan Mat Calibration

Now we need to print this sheet with all the little black dots. I click on the little printer icon in the toolbar across the top.

My print screen pops up and I’m going to click Print.

Pix Scan Mat Calibration

Then I’m going to select the printer that I will be using to print my stickers which is my Epson P600 and I print out the sheet full of dots on an 8.5” x 11” plain sheet of paper.

Next I need to take a photo of the dotted sheet with my phone or whatever camera you are using. I placed the dotted sheet on the floor (you need to use a flat surface), and tried my best to get all the dots without and background or edges of the paper showing. DO NOT use zoom.

Pix Scan Mat Calibration

Then I airdrop the photo from my phone to my laptop. If you can’t airdrop, you can email it to yourself as well. You need to somehow save the photo onto your computer so you can upload it to Silhouette Studio.

Back in Silhouette Studio in the Pix Scan dialogs box make sure the camera icon is selected. Below that, there is a Plus (+). Click on the (+), and find the photo that you just saved to your computer. Mine is saved to my Downloads folder.

Silhouette Studio automatically reads all the information attached to photo and it adds my iPhone X to the list of cameras.

Pix Scan Mat Calibration

Now it’s time to get our mat ready! Unfortunately the Pix Scan mat for the Portrait 3 is a little too small to fit a full sheet of 8.5” x 11” sticker paper, the max area is 7.6” x 11.7”. Make sure to plan your project accordingly! I already had my print outs, so I just cut them into two parts to fit on the mat.

Silhouette Portrait 3 Pix Scan Mat

Place whatever you are cutting on the mat, make sure you are NOT covering any of the little black boxes around the edge of the mat. The software will need to read those when you’re importing your picture.

Then you need to photograph the ENTIRE mat with the same camera that you calibrated. Make sure the mat is on a flat surface and there is even lighting. Don’t use zoom!

Silhouette Portrait 3 Pix Scan Mat

After you get your photo, you need to upload the photo to your computer. I use airdrop, but you could email it to yourself as well.

In the Pix Scan dialog box in Silhouette Studio, select “Import Pix Scan Image From File.” Locate your file wherever you have it saved on your computer, mine is in my Downloads folder again.

Silhouette studio is then going to place the photo that you just took and place it on the Pix Scan mat in the software.

Silhouette Portrait 3 Pix Scan Mat

Now we need to create our cut lines and there are a few ways to do that. I already have cut lines I created in Illustrator, I could import them as an SVG since I have the Business version of Silhouette Studio.

If you do not have the business version of Silhouette Studio, you can also draw the cut lines freehand in Silhouette Studio or you can use the Trace function.

I’m going to use the Trace function for these stickers since they’re irregular shapes. I will make a separate post later on how to use the trace tool.

Silhouette Portrait 3 Pix Scan Mat

I’m finished making my cut lines, and now it’s time to send to my machine! But first, I’m going to save my file so I can use these cut lines again on the second piece of sticker paper.

I go to the SEND tab in Silhouette Studio and since we’re just cutting, I’ll keep it on the Simple screen.

Silhouette Portrait 3 Pix Scan Mat

I load my mat into my machine, make sure the side with the arrow get’s fed through the machine first.

Silhouette Portrait 3 Pix Scan Mat

Press send, and now I have some cute little kitty stickers!

Silhouette Portrait 3 Pix Scan Mat

The accuracy of the Pix Scan Mat is so much better than the Cricut Snap Mat feature. I also really like that I can create and save my cut lines directly in Silhouette Studio. When I go to cut the the 2nd piece of this sticker sheet I can use the same cutline for the same kitties.